
Best practice in handling jobs containing both real graphic content and ‘technical marks’ has evolved over the last couple of decades. Technical marks include things like cut/die lines, fold lines, dimensions, legends etc in a page description language file (usually PDF these days). Much of the time, especially for pouches, folding carton and corrugated work, they’ll come originally from a CAD file and will have been merged with the graphics.
People will want to interact with the technical marks differently at various stages in the workflow:
- Your CAD specialists will want to see the technical marks and make sure that they’ve not been changed from the original CAD input.
- Brand owner approval may not want to see the technical marks, but prepress and production manager approvers will definitely want to see both the technical marks and the graphics together on their monitors, with the ability to make layers visible or invisible at will.
- In some workflows the technical marks from the PDF may be used to make a physical die, or to drive a laser cutter; in others an original CAD file will be used instead.
- On a digital press you may wish to print a short run of just the technical marks, or a combination of technical marks and graphics to ensure that finishing is properly registered with the prints.
- The main print run, whether on a conventional press (flexo, offset, etc) or digital, will obviously include the graphics, but won’t include most of the technical marks. You may want to include the legend on the print as fool-proof identification of that job, but you’ll obviously need to disable printing of any marks that overlap with the live area or bleed, such as cut and fold marks.
- Occasionally you may wish to do another short run with technical marks after the main print run, to ensure that finishing has not drifted out of register.
So there are a lot of places in the entire process where both technical marks and graphics may need to be turned on or off. How do you do that in your RIP?
Historically, the first method used to include technical marks, originally in PostScript, but now also in PDF, was to specify each kind of technical mark in a ‘technical separation’, encoded as a spot color in the job. Most operators tried to use a name for that spot color that indicated its intent, but there weren’t any standards, so you could end up with ‘Cut’ (or ‘CUT’, ‘cut’ etc), ‘cut-line’, ‘cut line’, ‘cutline’, ‘die’ etc etc. And that’s just thinking about naming in English. The names chosen are usually fairly meaningful to a human operator, but couldn’t be used reliably for automated processing because of the amount of variation.
As a result, many jobs arriving at a converter, at least from outside of that company, must be reviewed, and the spot names replaced, or the prepress and RIP configured to use the names from that job. That manual processing takes time and introduces the potential for errors.
But let’s assume you’ve completed that stage; how do you configure your RIP to achieve what you need with those technical separations?
The most obvious mechanism to turn off some technical marks is to tell the RIP to render the relevant spot colors as their own separations, but then not to image them on the print. It’s a very simple model, which works well as long as the job was constructed correctly, with all of the technical marks set to overprint. When somebody upstream forgot and left a cut or fold line as knockout (which never happens, of course!) you’d get a white line through the real graphics if the technical mark was on top of them.
The next evolution of that would be to configure the RIP to say that the nominated spot separation should never knock out of any other separation. That’s a configuration option in Harlequin RIPs but may not be widely available elsewhere.
Or you could tell the RIP to completely ignore one or more nominated spot colors, so they have no effect at all on any other marks on the page. Again, that’s a configuration option in Harlequin RIPs, and is one of the best ways of managing technical marks that are saved into the PDF file as technical separations.
Alternatively, since technical marks (like many other parts of a label or packaging job) are usually captured in a PDF layer (or optional content group to use the technical term), you can turn those layers on and off. Again, there are rich controls for managing PDF layers in Harlequin RIPs.
But none of these techniques get away from the need to manually check each file and set up prepress and the RIP appropriately for the spot names or layers that have been used for technical marks.
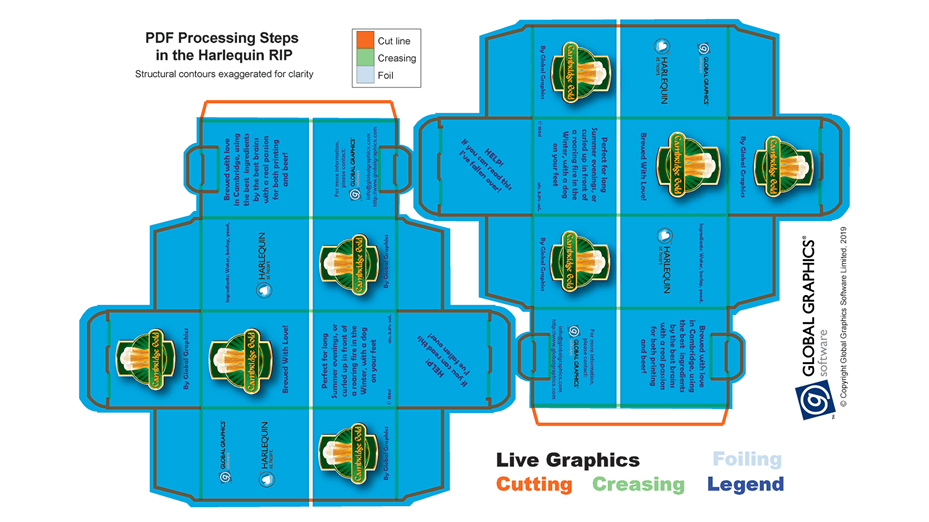
And that’s where the new ISO standard, 19593-1:2018 comes in. It defines “PDF processing Steps”, a mechanism to uniquely identify technical marks in PDF files, along with their intended function, from cutting to folding and creasing, to bleed areas, white and varnish, braille, dimensions, legends etc. It does this by building on the common practice of saving the technical marks in PDF layers, but adds some identification metadata that is not dependent on the vendor, the language or the normal practice of the originator, prepress or pressroom.
So now you can look at a PDF file and see definitively that a layer called ‘cut’ contains cutting lines. The name ‘cut’ is now just a convenience; the real information is in metadata which is completely and reliably computer-readable. In other words, it doesn’t matter if that layer were named ‘Schnittlinie’ or anything else; the manual step of identifying names that someone, somewhere put in the file upstream and figuring out what each one means, is completely eliminated.
We implemented support for PDF Processing Steps into version 12.1r0 of the Harlequin RIP, and have worked with a number of vendors whose products create files with Processing Steps in them (including Hybrid Software, Esko and Callas) to ensure that everything works seamlessly. We also worked through a wide variety of current and probable use cases to ensure that our implementation can address real-world needs. As an example we added the ability to control all graphics on a PDF page that aren’t in Processing Step layers as if they were just another layer.
In practice this means that Harlequin can be configured to deliver pretty much whatever you need, such as:
- Export all technical marks identified as Cutting, PartialCutting, CuttingCreasing etc to a vector format to drive a cutting machine.
- Render and print all technical marks, but none of the real graphics, for checking registration.
- Render the real graphics, plus dimensions and legend, for the main print run.
PDF Processing Steps promises the ability to control technical marks without needing to analyze each file and create a different setup for each job.
The most important thing that PDF Processing Steps gives us is that you can create a configuration for one of those use cases (or for many other variations) and know that it will work for all jobs that are sent to you using PDF Processing Steps; you won’t need to reconfigure for the next job, just because an operator used different spot names.
Of course, it’ll take a while for everyone to migrate from using spot names to PDF Processing Steps. But I think you’ll agree that the benefits of doing so, in increasing efficiency and reducing the potential for errors, are obvious and significant.
For more information read the press release here.
2 Replies to “PDF Processing Steps – the next evolution in handling technical marks”
Comments are closed.