Digital watermarking in print workflows – Part 2 – When to add a digital watermark

In this second post about digital watermarking in the print workflow, author Martin Bailey explains the stages when it’s possible to add a digital watermark.

Digital watermarking is an emerging technology, part of the latest step on the evolution of product identification. Global Graphics Software has partnered with Digimarc, a leader in digital watermarking and a member of our Partner Network, to explore this topic and future developments.

Adding a digital watermark during the design stage

In some workflows the designer may apply digital watermarks to a design by, for instance, using a plugin to an application such as Adobe Illustrator. This is equally appropriate for both steganography and an artwork masking layer, and gives the maximum opportunity for approval of the design with the digital watermark in place, and for any rework to the design that might be requested to realize the greatest benefit from using that watermark.
It will not normally be appropriate for the digital watermark to be added by the designer if each instance of the print requires unique data to be encoded in it; variable data composition is usually performed later in the workflow.

Application of digital watermarking has different advantages and disadvantages at various stages in the design and production workflow
Application of digital watermarking has different advantages and disadvantages at various stages in the design and production workflow.

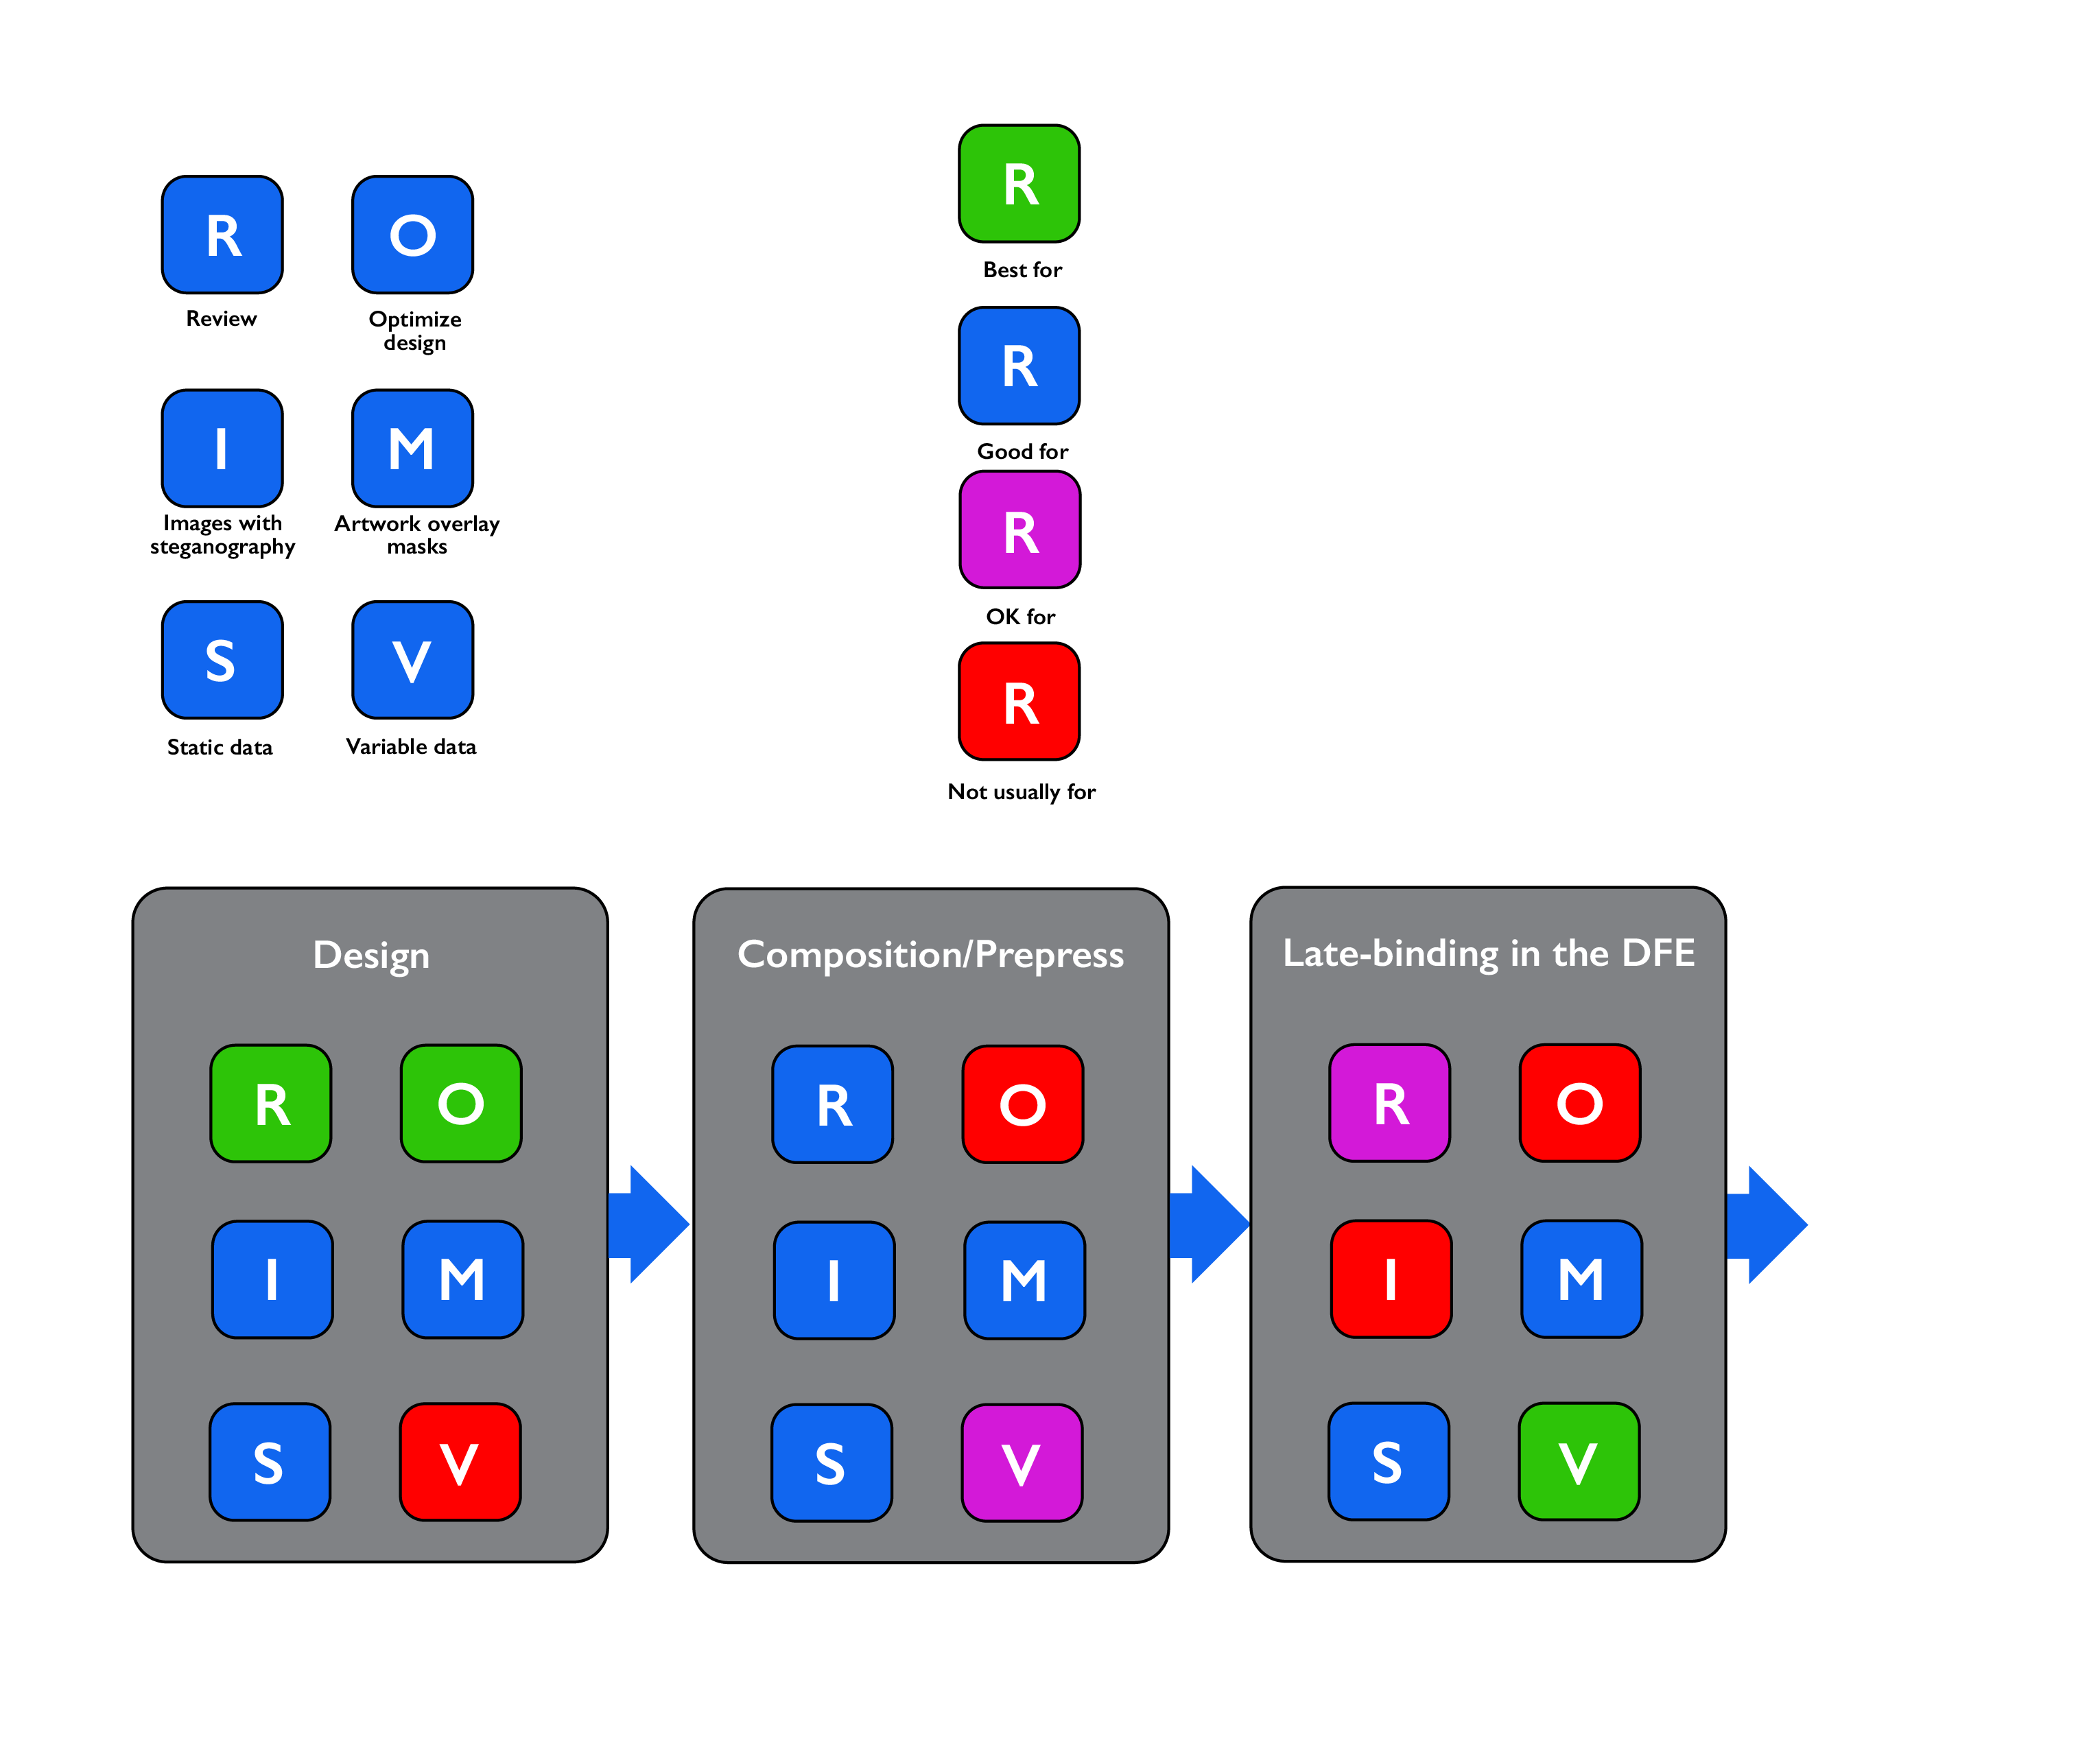
Adding a digital watermark in composition/prepress

In other workflows adding the digital watermark may be a function of a variable data composition or prepress department. Just as for application by the designer, this is applicable for both steganography and an artwork masking layer. There is a reasonable opportunity for approval of the design with the digital watermark in place. But it would be slower and more expensive to rework the design if that is required at this stage than if the watermark were added by the designer.

If the digital watermark is added in prepress then it can carry both static and variable data. As discussed above, however, variable data is best suited to use of an artwork masking layer rather than steganography, if only because of the amount of data that must be generated and then incorporated into a PDF file when steganography is used for a significant number of unique codes.

But applying even an artwork masking layer in prepress does bulk up the resulting print-ready PDF file with many copies of that layer, each one carrying different data. And it can also slow down processing in the Digital Front End (DFE) for a digital press. An overprinted graphic covering large areas of each piece of output in the PDF file can make it harder for the variable data optimization in a DFE to break the design apart so that it can minimize the total amount of processing required to read, color manage, render and halftone screen the job. (See Global Graphics Software’s guide: Full Speed Ahead: How to make variable data PDF files that won’t slow your digital press.)

Late-binding in the Digital Front End (DFE)

A new development in the application of digital watermarking is to add the marks right at the very last minute before the data is printed. In our SmartDFE™, for example, this can be done in parallel with or after the color management and rendering.

Applying the watermarks in parallel with color management and rendering (in the RIP) allows full access to all color channels for the output, while also removing the need to generate a fully resolved “optimized PDF” or PDF/VT file containing all of the variable data further upstream. In turn, this can reduce the overhead of optimizing variable data processing in the RIP. The final result is increased throughput, both in composition/prepress and in the DFE.

Applying marks after the RIP enables even higher performance through the DFE, with the added benefit of providing a more predictable processing speed because the amount of processing required is more deterministic than is rendering PDF. This might restrict the watermark to be painted in only one color channel, though.

Increasing speed and predictability in the DFE allows the use of lower cost hardware in those DFEs, or assists with printing at full engine speed for a larger proportion of jobs.

Late-binding application of digital watermarks will also always occur in an environment where the characteristics of the press that will be used to print the items are known, including resolution, bitdepth etc.

These benefits make this the optimum choice for highly efficient printing workflows for variable data digital watermarks, driving digital presses at full engine speed. The trade-offs are that it’s a little harder to review and approve proofs of the output, and that use for images with steganography is not usually appropriate.

This is an excerpt from the white paper: Optimizing Digital Watermarking in Print Workflows. To learn more about digital watermarking download your copy:

DOWNLOAD YOUR COPY OF THE WHITE PAPER

White paper: Optimizing digital watermarking in print workflows

About the author

Martin Bailey, CTO, Global Graphics Software

Martin Bailey, former distinguished technologist at Global Graphics Software, is currently the primary UK expert to the ISO committees maintaining and developing PDF and PDF/VT. He is the author of Full Speed Ahead: how to make variable data PDF files that won’t slow your digital press, a guide offering advice to anyone with a stake in variable data printing including graphic designers, print buyers, composition developers and users.

Further reading

  1. How to add a digital watermark

To be the first to receive our blog posts, news updates and product news why not subscribe to our monthly newsletter? Subscribe here

Follow us on LinkedIn,  Twitter and YouTube

Digital watermarking in print workflows – Part 1 – How to add a digital watermark

Digital watermarking is an emerging technology, part of the latest step on the evolution of product identification. Global Graphics Software has partnered with Digimarc, a leader in digital watermarking and a member of our Partner Network, to explore this topic and future developments.

In this first of two posts, Martin Bailey explains the ways you can add a digital watermark:

A digital watermark may be added in one of two ways:

1. Using steganography
If a product design includes images, whether photographic or generated digitally, data can be hidden within that image data using steganography. Steganography is the practice of concealing a message within another message or a physical object (source: Wikipedia).

In order to hide the data, the color values of individual pixels in the image are altered in a way that is intended to not be obvious to the human eye. The alterations may need to be applied slightly differently depending on the image content and the print technology to be used. This means it’s often valuable to be able to proof a design with the images in place, and to do that either on the printing device that will be used for production, or on one that has been carefully tuned to reproduce color, tones and levels of detail to match that production device.

Alternatively both the printer/converter and their customer can inspect the artwork and verify the Digimarc code using PACKZ® or CLOUDFLOW® Proofscope, professional prepress tools from HYBRID Software. As well as checking for the correctness of the code, this also allows verification that the code placement conforms to the customer’s requirements, and supports a formal approval process.

Reviews of the proofed output may lead to a decision to re-embed the data into the image with slightly different parameters. Systems to automate that adjustment are improving, but the advisability of proofing means that steganography is best used at a point in the workflow where an appropriate review and reconfiguration may be made without disrupting throughput.

Steganography is a very effective technique if the same image will be used on every instance of an item because it can be difficult for a forger to reproduce. But if your goal is to encode unique data in each instance, you’d have to generate an altered image for each one. When you’re producing watermarks for a large number of instances that would mean generating a huge number of copies of what started off as a single image. In most workflows and for most products that’s not a commercially viable approach.

2. Artwork masking layer
The second method for adding a digital watermark is to overlay an “artwork masking layer” that encodes the desired data. This is a pattern of graphics across large areas of the design, making sure that those graphics are sufficiently fine that they are not immediately apparent to a viewer. In practice this usually means something that looks like a sprinkling of very fine dots under a magnifying glass or loupe.

A digital watermark as an artwork masking layer over a plain yellow area of a job.

These overlays are also very difficult for a forger to reproduce. They have the advantage over hiding data in images that they can also be used in efficient workflows to carry unique data for each product instance; there is much less data to handle for every copy.

This is an excerpt from the white paper: Optimizing Digital Watermarking in Print Workflows. To learn more about digital watermarking download your copy:

DOWNLOAD YOUR COPY OF THE WHITE PAPER

White paper: Optimizing digital watermarking in print workflows

About the author

Martin Bailey, CTO, Global Graphics Software

Martin Bailey, former distinguished technologist at Global Graphics Software, is currently the primary UK expert to the ISO committees maintaining and developing PDF and PDF/VT. He is the author of Full Speed Ahead: how to make variable data PDF files that won’t slow your digital press, a guide offering advice to anyone with a stake in variable data printing including graphic designers, print buyers, composition developers and users.

Further reading

  1. When to add a digital watermark in the print workflow

To be the first to receive our blog posts, news updates and product news why not subscribe to our monthly newsletter? Subscribe here

Follow us on LinkedIn,  Twitter and YouTube

New guides for best practice in creating print files for variable data printing

Best practice in creating PDF files for Variable Data Printing
Two new guides, one for designers and one for developers, to ensure best practice in creating PDF files for variable data printing are available now from the PDF Association.

When talking with digital press vendors it soon becomes apparent that the only thing more important than speed is quality; the only thing more important than quality is cost; and the only thing more important than cost is speed. I think I’d have to ask M C Escher for an illustration of that!

To focus on speed, what a press vendor usually means when talking to Global Graphics Software is “I need the Digital Front End (DFE) for my press to be able to print every job at full engine speed”, which is a subject that  we’re very happy to talk about and to demonstrate solutions for, even as the press engines themselves get faster with every new version.

But the components such as the RIP in a DFE are not the only things that can affect whether a press can be driven at full engine speed. There are plenty of things that a designer or composition engine can do that can vary how fast a PDF file can be RIPped by several orders of magnitude, without affecting the visual appearance of the print.

Obviously we like it when the files are efficiently built, but sometimes it’s not obvious to a designer, or a software developer working on either a design application or composition engine how they might be able to improve the files that they generate. That’s why we created a guide called “Do PDF/VT Right” back in 2014, stuffed full of actionable recommendations for both designers and developers making PDF files for variable data printing.

Over the years since we’ve updated and extended the guide. The rework in 2020 was sufficiently significant that we renamed it to “Full Speed Ahead: How to make variable data PDF files that won’t slow your digital press”.

It’s been very well received, and clearly filled a gap in materials available for the target audience; there have been thousands of downloads and printed copies given away at trade shows.

At the end of 2020 a new PDF/VT standard, PDF/VT-3, was published, and the committee in ISO that had developed it asked the PDF Association to write application notes for it, to assist developers implementing it with more extensive detail than can be included in International Standards. That sounds very formal, but in practice the two committees have many members in common (as an example I was project editor on PDF/VT-3 and I co-chair the PDF Association’s PDF/VT Technical Working Group (TWG)). The hand-over was mainly to enable much more agile and responsive document development and more flexibility around publication.

After some debate the PDF/VT TWG decided that what the industry really needed was a best-practice guide in how to construct efficient PDF files for VDP, whether they’re PDF/VT or ‘just’ “optimized PDF”. Any developer who has worked with PDF/VT-1 should have no trouble in implementing VT-3, but there are still some issues with slow processing of very inefficient PDF files preventing print service providers, converters etc from running their digital presses at full engine speed.

The next step was to agree to do the development of that guide in a new form of committee within the PDF Association, specifically so that people who were not members of the Association could be involved.

At this stage Global Graphics offered the text of Full Speed Ahead as a starting point for the Association guide, an offer that was very quickly accepted. But it was felt that it could be made more accessible if two editions of the guide were produced: one for designers and one for developers, rather than combining the two into a single document. Amongst other things it means that each guide can use the most appropriate terminology for each audience, which always makes reading easier.

We were lucky to have Pat McGrew working with us and she took over as champion for the designer edition, while I led on the developer one.

And so I’m very happy to announce that both the Developer and Designer editions of the PDF Association’s “Best Practice in creating PDF files for Variable Data Printing” have just been published and are available with a lot of other useful resources at https://www.pdfa.org/resources/.

DOWNLOAD
BEST PRACTICE IN CREATING PDF FILES FOR VARIABLE DATA PRINTING – DESIGNER EDITION

BEST PRACTICE IN CREATING PDF FILES FOR VARIABLE DATA PRINTING – DEVELOPER EDITION

About the author

Martin Bailey, CTO, Global Graphics Software

Martin Bailey, former distinguished technologist at Global Graphics Software, is currently the primary UK expert to the ISO committees maintaining and developing PDF and PDF/VT and is the author of Full Speed Ahead: how to make variable data PDF files that won’t slow your digital press, a guide offering advice to anyone with a stake in variable data printing including graphic designers, print buyers, composition developers and users.

Further reading

  1. Full Speed Ahead: How to make variable data PDF files that won’t slow your digital press
  2. Compliance, compatibility, and why some tools are more forgiving of bad PDFs
  3. What the difference between PDF/X-1a and PDF/X-4

To be the first to receive our blog posts, news updates and product news why not subscribe to our monthly newsletter? Subscribe here

Follow us on LinkedIn and Twitter

Processing PDF without in-RIP color management

Twenty years ago it was common to find people RIPping jobs for production print with no color management. Indeed, many print service providers (PSPs), magazine publishers etc actively avoided it as being “too complicated” and “unpredictable”. You might read that as an indictment of their vendors for a lack of investment either in developing good product or in educating their users. Alternatively it might simply show that the printing companies were quite understandably risk-averse because it could be expensive if the client didn’t like the resulting color, especially in an environment like display advertising in a major magazine, or packaging for a major brand.

A decade after that more and more people (on both the buying and the printing sides) grasped the value of color management in print and were using it, but there was still a significant minority that had not managed to make the time to understand it. This is borne out by the uproar when Adobe ‘forced’ people to use color management by changing from using CMYK for the alternate color space for Pantone spots in Creative Cloud to using Lab1, and by the continuing demand for support for PDF/X‑1a, where everything has already been converted to press colorants before the PDF is made.

Now we’re in 2022, and the need for color management is accepted almost universally in print sectors that use an ink set based on CMYK. I phrased it that way because some of the industrial print space (textiles, ceramics, laminate flooring etc) have historically used many inks, but usually job-specific rather than CMYK. Some of those markets will continue to use job-specific ink sets as they transition to digital, while others would find a switch to digital extremely challenging without a concurrent switch to a color managed workflow2.

So, why am I writing this now?

It’s because I still talk to people who tell me that they don’t need to do any color management inside the RIP when processing PDF; they RIP it first and then apply color management.

I’m sorry, that just won’t work reliably and with maximum quality.

There was a time, back in the days when PDF 1.3 was the latest and greatest (which pretty much means last millennium) when a PSP could get away with this approach, because their customers were happy to define all their colors in CMYK and spots. As soon as they used anything else, including Lab or colors tagged with ICC profiles, they’d have to have some fallback to generate CMYK values from that data. It doesn’t need a full color management module (CMM), but they’d need something.

And then along came PDF 1.4, adding transparency. And transparency requires that you can convert colors between color spaces, potentially multiple times. That’s because PDF transparency includes the concept of transparency groups. Each group is one or more graphics that are blended with any graphics that are behind them in the design.

The blending depends on a number of parameters, the most obvious of which are the blend mode (Overlay, Multiply, Hard Light etc), and the blend color space. The result of rendering all graphics that are underneath the transparency group will be transformed from whatever space the RIP holds it in (often the CMYK for the output device) into the blending color space. The result of rendering all the graphics inside the transparency group itself is also transformed into the blending color space. Then the blend mode is applied, to do the actual transparency calculation, and the result is transformed back into whatever color space the RIP needs it to be in for further processing (again, often the CMYK of the output device). The blending color space is quite often sRGB, because that’s the default in a number of popular design applications.

So correct rendering of the transparency will often require color transforms between the color space in which graphics are specified (such as, maybe, an image tagged with an ECI RGB ICC profile), the blend color space (most commonly sRGB) and the output device color space (usually a specific CMYK). That’s just not possible without applying a pretty complete color management process during RIPping. And if you try to take short-cuts you’ll usually get a visually different result, sometimes very different.

Color transformation with transparency requires a full color management capability.

Even so, back in the early 2000s a PSP could avoid the need to upgrade software, process control and operator training by insisting that their customers supplied files in a format such as PDF/X-1a, which prohibited device-independent colors and transparency. But making a PDF/X-1a file from a rich design in a creative application requires a number of compromises affecting graphical elements that were originally specified in device independent colors, or which use transparency. Both risk degrading the quality of the final piece.

These days insisting on PDF/X-1a to avoid the need for color management in the RIP is no longer widely acceptable to customers3. And therefore neither is color managing after the RIPping is complete.

Your check-list is therefore:

  • Don’t use PDF/X-1a. In fact don’t use PDF/X-3 either. Both are two decades old. PDF/X-3 may allow device-independent colors, but both of them force the creation tool to flatten transparency, discard layers and a bunch of other potentially damaging procedures. It’s over ten years since PDF/X-4 was published, and that’s currently the best balance between capability and getting too far ahead of common usage in print workflows.
  • If you’re a print service provider, converter, industrial printing manufacturer or digital press vendor, don’t cut corners; use a workflow that applies the color management in or before the RIP4. It shouldn’t be hard; all the leading RIP vendors (and therefore leading press vendors, because they license technology from the RIP vendors) supply suitable systems.

About the author

Martin Bailey, consultant and former 0CTO, Global Graphics Software

Martin Bailey, consultant at Global Graphics Software, is a former CTO of the company and currently the primary UK expert to the ISO committees maintaining and developing PDF and PDF/VT. He is the author of Full Speed Ahead: how to make variable data PDF files that won’t slow your digital press, a guide offering advice to anyone with a stake in variable data printing including graphic designers, print buyers, composition developers and users.

To be the first to receive our blog posts, news updates and product news why not subscribe to our monthly newsletter? Subscribe here

Follow us on LinkedIn,  Twitter and YouTube

Notes
1 – If a spot color will be emulated using process inks on press, then using a CMYK alternate gives predictable color numbers in those inks, but is less good at producing a predictable color appearance. Using Lab for the alternate color space often leads to unpredictable color numbers on each separation, but a more predictable color appearance on the print. There is a benefit to both models, but when it comes to paying for printing the color appearance usually wins!

2 – if run-lengths on digital are long enough to justify warehousing a variety of inks, and changings inks on inkjet presses, it can be reasonable to stay with job-specific ink sets, especially if it’s difficult or expensive to make usable inks for all of CMY and K. As an example, the best Magenta ink for inkjet printing on ceramics is made with gold. Any move to using digital presses for short-run printing more or less requires a fixed ink set to allow for quick job changes without excessive waste, and that typically means CMYK+.

3 – and I say that as the chair of the committees that developed PDF/X for many years, first in CGATS and then in ISO.

4 – There are situations where applying color management in a color server before the RIP can be useful, especially when multiple presses will be used in parallel. This approach brings its own challenges around handling spot colors in the job that will be emulated on press, but can produce excellent results when used with care.

Unlocking the Holy Grail: the key to mass customization at mass-production prices

Mass-personalized or -customized products at near mass-production prices is a huge potential area for growth for digital print. Only with digital can you print in real time onto anything and everything, such as 3D objects, clothing, flooring, tiles and wallcoverings, to give a unique customized product.

In this post, Martin Bailey, former CTO and now consultant at Global Graphics Software, explores the rise of the use of variable data and how digital inkjet is the key to unlocking the Holy Grail for many retailers: mass customization at near mass-production prices.


It’s common to think of variable data printing, where at least some of every instance is different from every other instance, as being the preserve of transactional and direct mail printing. Admittedly, that’s where much of it started, but in the broadest sense of the term, variable data printing is now used far more widely, across multiple industries. In situations where the delivery of the product is through a push model (where there is no direct connection between each item produced and a specific recipient at the time of production) several cases are common. Most of these cases are in B2B environments, where the buyer then sells or delivers the result, often B2C.

In mainstream commercial print, labels, packaging and industrial manufacturing, it’s difficult to imagine an alternative to the push model, even given the huge amount of metadata that some companies, such as luxury goods brands and supermarkets, are collecting on their customers.

But there are many situations where there’s a much closer relationship between an end user of the product and the organization that printed or manufactured it, which can be described as a pull model instead. Many of these cases move beyond the traditional idea of variable data as being text and barcodes imaged on top of a static background to each piece being truly unique. They deserve to be described as mass customization, and all of them have been enabled by web-to-print or other forms of online ordering.

The wide format market has long provided display and soft signage, sportswear, tee shirts and car wraps to custom designs on very short runs, down to a single copy. Both signage and sportswear are aimed at both B2B and B2C markets.

Photofinishing has long been a B2C business and has used digital printing for decades. The industry has learned that simply producing 5” x 7” prints does not generate significant profits, but has grown first into photobooks, and then into many other forms of product decoration, printing photographs on hats, shoes, apparel, bed linen, mugs etc and converging with what have historically been wide format opportunities. Each individual order, perhaps for one mug with a photo printed on it, may not appear to be variable data printing. But when orders are aggregated at the producer there may be hundreds or thousands of mugs to be printed per day, each with a different image.

Photobooks offer higher margins than simple print finishing
Photobooks offer higher margins than simple print finishing.

The same business model is applied more broadly to print designs which may be uploaded by the customer and/or created in a web portal by combining the customer’s text and graphics from a library. Examples include phone cases, tee shirts, postcards and greetings cards.

And a number of providers effectively act as publishers for customer designs, managing printing and fulfilment for a variety of products or lengths of custom-printed textile. Examples include Red Bubble and Spoonflower.

Several brands have run campaigns whereby products can be ordered with a name on them, usually for gifting. Examples include “My Nutella” and “My Marmite”. A variant of this is where only a label is purchased, often for bottles of spirits, to be applied to the product by the purchaser themselves.

The most famous campaign for ‘personalized’ labels was Coca-Cola’s “Share a Coke”, but in practice most labels were printed in long runs, randomizing the most common names in each country; only labels from roadshows and purchases from the web were actually printed on demand for specific recipients. This makes it an excellent example of a hybrid model taking advantage of the benefits of multiple print technologies.

Personalized Marmite jars - personalized product for gifting can attract a significant premium
Personalized product for gifting can attract a significant premium.1

Even in industries producing a design that would historically have been created in multiple mile or kilometer lengths, such as wallcoverings, there are opportunities for increased margins in custom delivery. As an example, consider a decorating company that has been contracted to apply wallcoverings to a large office. If a wallcovering vendor could deliver pre-cut drops of the wallcovering, each of exactly the right length, and with the pattern starting in exactly the right place so that each drop aligns with those on either side, that would save the decorating company a lot of time. And that, in turn, would allow the vendor to charge a sufficient premium to more than cover the reduced total length required because there is no longer any wastage from the decorators cutting each drop to ensure alignment.

A lot of the demand for this mass customization is ascribed to the changing attitudes and communication preferences of millennials and Gen-Z. To generalize, it’s often said that such audiences demand to be treated, and be able to represent themselves as unique, requiring them to be able to obtain unique product in support of that position.

But the demand is not specific to any age group, according to “The Deloitte Consumer Review – Made-to-order: The rise of mass personalization”, based on survey results from YouGov, which also went on to say: “1 in 5 consumers who expressed an interest in personalized products or services are willing to pay a 20% premium”; that figure rises to around 1 in 2 for customized clothing, furniture, homeware and DIY.

Demand for customized product is not restricted to any particular age group.

Of course, personalized and customized products are not warehoused at all; they’ve been created for a specific recipient and will usually be shipped immediately.

Inkjet can achieve unique results

Taking short runs to the extreme, a significant advantage for inkjet that applies across the majority of industries is that it does not need to simply reproduce the same invariant design repeatedly, even for a short run; instead, it can make every item different.

Inkjet can achieve unique results in a variety of different industries and being unique in a useful way is a very effective lever for premium pricing and increased profitability.


This is an excerpt from the white paper: Software considerations for inkjet in the smart factory


DOWNLOAD YOUR COPY OF THE WHITE PAPER

White paper: Software considerations for inkjet in the smart factory

Further reading:

What you need to build a press that must handle variable data jobs at high speed

Watch the video: Connecting print to a Smart Factory:

To be the first to receive our blog posts, news updates and product news why not subscribe to our monthly newsletter? Subscribe here

Follow us on LinkedIn and Twitter

1https://www.marmite.co.uk/products/shop/marmite-personalised-classic-jar.html

Keeping up to date – how the car analogy may no longer be relevant in the printing world

In his latest blog post, Martin Bailey, consultant at Global Graphics Software, takes a look at some of the reasons why his go-to car analogy to help his audience understand the world of print may no longer be as relevant as it once was:

Over the years I’ve used analogies in many of my blog posts, conference presentations and white papers; they’re a very effective way of sharing a high-level understanding of sometimes complex ideas. I’m not a car fanatic, so I’ve not had any specific motivation to compare print technologies to anything around cars, but for some reason it seems that car analogies have consistently just worked, so I’ve used them.

But I realized recently that I’m going to have to rework some of them in response to the growth of electric vehicles replacing internal combustion. I know that growth is very uneven across the world (wow, go Norway!), but it’s clearly the future of motoring for many of us. Much of what I write and report might be summarized as “this is the future and how we’ll get there”, so building on something that will become more and more outdated for many readers and listeners introduces an unwelcome distraction from the analogy. It also makes it less effective because analogies must be based on a common understanding or experience, otherwise they just don’t work.

On the other hand, internal combustion vehicles are not even close to the point yet where all readers and listeners will regard them as dinosaurs of historical interest only. So I can’t sensibly use them as a representation of what we were all doing in the past.

So, I thought I’d look through some of the car-based analogies I’ve used to see which need updating, and which are fine as they are:

I’ve often compared a digital press and its associated digital front end (DFE) to the components of a car:

  • The supplied job file, probably in PDF, is the fuel
  • The steering wheel and dashboard are the DFE control systems and user interface
  • The engine is the RIP (clearly the most important part of the entire system, but then I may be biased!)
  • The gearbox and transmission are the electronics and drivers, like those from our friends at Meteor inkjet
  • The wheels are the inkjet heads, actually putting the rubber/ink on the road/substrate

Well, some of those parts still make sense, but I’m not sure that I can equate submitting a PDF file to charging a battery. Somehow the motors in an electric vehicle never seem to have the prominence that I’d personally give to a RIP. And the motors are often linked direct to the wheels, with less of the gearbox and transmission infrastructure than you’d use for internal combustion. This one needs some serious fixing.

Next up is a statement that we used, for example, in Full Speed Ahead: how to make variable data PDF files that won’t slow your digital press: that making a PDF file constructed for efficiency is like using better fuel in a car. There can be a clear step-up from regular to super for gasoline/petrol, but electricity is electricity, at least once it’s in the car battery.

I guess you could argue that charging points with different power capabilities, from 7kW up to 350kW, will significantly affect how long it will take to recharge the car, and therefore on how far you can get in a day, but it’s not really the same discussion. That’s another analogy that I’m going to have to work on.

And finally, for now, I’ve described companies who build digital presses without thinking about software to process job files and proper user interfaces as being like people thinking they can sell rolling chassis: cars with no bodywork, no seats and not even a cup-holder. You may get a few sales for that in specialist markets, but it’s not exactly a mass market.

Of the three analogies I’ve listed here, I think this is the only one that might survive unscathed, although it probably has less value without being able to equate the other bits of the car to digital press and DFE components.

As I said to start with, I had no reason to pick cars as the base for analogies that I use other than that they seemed to work well. I have a feeling that may not be as true in the future. I guess there did have to be one advantage to big oil!

About the author

Martin Bailey, CTO, Global Graphics Software

Martin Bailey, consultant at Global Graphics Software, is a former CTO of the company and currently the primary UK expert to the ISO committees maintaining and developing PDF and PDF/VT. He is the author of Full Speed Ahead: how to make variable data PDF files that won’t slow your digital press, a guide offering advice to anyone with a stake in variable data printing including graphic designers, print buyers, composition developers and users.

To be the first to receive our blog posts, news updates and product news why not subscribe to our monthly newsletter? Subscribe here

Follow us on LinkedIn and Twitter

A nostalgic look back at the ISO PDF/X standard

In this blog post, Martin Bailey recalls his days as the first chair of the ISO PDF/X task force and how the standard has developed over the last 20 years.

Over the last few years there has been quite an outpouring of nostalgia around PDF. That was first for PDF itself, but at the end of 2021 we reached two decades since the first publication of an ISO PDF/X standard.

I’d been involved with PDF/X in its original home of CGATS (the Committee for Graphic Arts Technical Standards, the body accredited by ANSI to develop US national standards for printing) for several years before it moved to ISO. And then I became the first chair of the PDF/X task force in ISO. So I thought I’d add a few words to the pile, and those have now been published on the PDF Association’s web site at https://www.pdfa.org/the-route-to-pdf-x-and-where-we-are-now-a-personal-history/.

I realised while I was writing it that it really was a personal history for me. PDF/X was one of the first standards that I was involved in developing, back when the very idea of software standards was quite novel. Since then, supported and encouraged by Harlequin and Global Graphics Software, I’ve also worked on standards and chaired committees in CIP3, CIP4, Ecma, the Ghent Working Group, ISO and the PDF Association (I apologise if I’ve missed any off that list!).

It would be easy to assume that working on all of those standards meant that I knew a lot about what we were standardising from day one. But the reality is that I’ve learned a huge amount of what I know about print from being involved, and from talking to a lot of people.

Perhaps the most important lesson was that you can’t (or at least shouldn’t) only take into account your own use cases while writing a standard. Most of the time a standard that satisfies only a single company should just be proprietary working practice instead. It’s only valuable as a standard if it enables technologies, products and workflows in many different companies.

That sounds as if it should be obvious, but the second major lesson was something that has been very useful in environments outside of standards as well. An awful lot of people assume that everyone cares a lot about the things that they care about, and that everything else is unimportant. As an example, next time you’re at a trade show (assuming they ever come back in their historical form) take a look and see how many vendors claim to have product for “the whole workflow”. Trust me, for production printing, nobody has product for the whole workflow. Each one just means that they have product for the bits of the workflow that they think are important. The trouble is that you can’t actually print stuff effectively and profitably if all you have is those ‘important’ bits. To write a good standard you have to take off the blinkers and see beyond what your own products and workflows are doing. And in doing that I’ve found that it also teaches you more about what your own ‘important’ parts of the workflow need to do.

Along the way I’ve also met some wonderful people and made some good friends. Our conversations may have a tendency to dip in and out of print geek topics, but sometimes those are best covered over a beer or two!

About the author

Martin Bailey, CTO, Global Graphics Software

Martin Bailey is currently the primary UK expert to the ISO committees maintaining and developing PDF and PDF/VT and is the author of Full Speed Ahead: how to make variable data PDF files that won’t slow your digital press, a new guide offering advice to anyone with a stake in variable data printing including graphic designers, print buyers, composition developers and users.

Further reading

  1. Compliance, compatibility, and why some tools are more forgiving of bad PDFs
  2. What the difference between PDF/X-1a and PDF/X-4

Be the first to receive our blog posts, news updates and product news. Why not subscribe to our monthly newsletter? Subscribe here

Follow us on LinkedInTwitter and YouTube

Connecting the present to the past

I finally made time for a very overdue tidy of my filing cabinet yesterday. In between wondering why I still had receipts from travel in 2003, I tripped over a piece of history: it’s a Harlequin Harpoon board, a hardware accelerator for halftone screening and part of the technology that allowed Harlequin to become the first to RIP the Seybold Musicians’ speed test page in under 60 seconds.

A Harlequin Harpoon board, a hardware accelerator for halftone screening and part of the technology that allowed Harlequin to become the first to RIP the Seybold Musicians' speed test page.
A Harlequin Harpoon board, a hardware accelerator for halftone screening.

Speed is still a key focus for Global Graphics Software, but the Harpoon was designed for screening for offset plates, and developments in chips and compilers by Intel, AMD, Microsoft and others, together with further optimizations to Global Graphics Software code, removed the need for custom hardware for that use case fairly soon afterwards.

Today’s challenge is much more for digital presses, and especially for inkjet. Current press speeds make the idea of celebrating RIPping and screening a single page in less than a minute seem quaint and even slightly bizarre; very last millennium! The fastest digital presses now print well over the equivalent of 10,000 pages per minute, often with every page different, which means that at least something on every page must be RIPped and screened, at full engine speed.

For that kind of performance, or even a more common 100 m/min for a narrow-web label press, it’s now normal to use multiple RIPs in parallel and to share the pages out between them. This makes it tricky to use custom hardware unless that is tied to specific ink channel delivery, because otherwise it must be load-balanced in a way that complements the load-balancing across the RIPs. We still see some custom hardware associated with raster delivery to the heads in the press, but nowhere else in current systems.

For the same reason, increasing the raw speed of a single RIP is no longer a target; scheduling pages to each RIP in a cluster and managing the rasters delivered by each one, together with managing the interactions between those multiple RIPs, are far more important. System engineering is now a key part of being able to drive inkjet presses at full speed without an unfeasibly high bill of materials for the Digital Front End, almost as much as the core technologies themselves.

In other words Global Graphics’ Direct™ and SmartDFE™ technologies are the logical successors of the Harpoon board, bringing affordable and reliable speed to a new generation of printing technology. But there’s still something rather nice in being able to hold a physical piece of history in my hands!

About the author

Martin Bailey, CTO, Global Graphics Software

Martin Bailey, Distinguished Technologist, Global Graphics Software, is currently the primary UK expert to the ISO committees maintaining and developing PDF and PDF/VT and is the author of Full Speed Ahead: how to make variable data PDF files that won’t slow your digital press, a new guide offering advice to anyone with a stake in variable data printing including graphic designers, print buyers, composition developers and users.

Be the first to receive our blog posts, news updates and product news. Why not subscribe to our monthly newsletter? Subscribe here

Follow us on LinkedInTwitter and YouTube

What you need to build a press that must handle variable data jobs at high speed

I’ve spoken to a lot of people about variable data printing and about what that means when a vendor builds a press or printing unit that must be able to handle variable data jobs at high speed. Over the years I’ve mentally defined several categories that such people fall into, based on the first question they ask: 

  1. “Variable data; what’s that?” 
  2. “Why should I care about variable data, nobody uses that in my industry?” 
  3. “I’ve heard of variable data and I think I need it, but what does that actually mean?” 
  4. “How do I turn on variable data optimization in Harlequin?” 

If you’re in the first two categories, I recommend that you read through the introductory chapters of our guide: “Full Speed Ahead: how to make variable data PDF files that won’t slow your digital press”, available on our website. 

And yes, unless you’re in a very specialised industry, people probably are using variable data. As an example, five years ago pundits in the label printing industry were saying that nobody was using variable data on those. Now it’s a rapidly growing area as brands realize how useful it can be and as the convergence of coding and marking with primary consumer graphics continues. If you’re a vendor designing and building a digital press your users will expect you to support variable data when you bring it to market; don’t get stuck with a DFE (digital front end) that can’t drive your shiny new press at engine speed when they try to print a variable job. 

If you’re in category 3 then you’re in luck, we’ve just published a video to explain how variable data jobs are typically put together, and then how the DFE for a digital press deconstructs the pages again in order to optimize processing speed. It also talks about why that’s so important, especially as presses get faster every year. Watch it here:
 

And if you’re in category 4, drop us a line at info@globalgraphics.com, or, if you’re already a Harlequin OEM partner, our support team are ready and waiting for your questions.

Further reading:

  1. What’s the best effective photographic image resolution for your variable data print jobs?
  2. Why does optimization of VDP jobs matter?
  3. There really are two different kinds of variable data submission!

Be the first to receive our blog posts, news updates and product news. Why not subscribe to our monthly newsletter? Subscribe here

Follow us on LinkedInTwitter and YouTube


Working with spot colors in Harlequin Core

Whenever we start working with a company who’s interested in using Harlequin Core™ for their Digital Front End (DFE), there are always three technical topics under discussion: speed, quality and capabilities. Speed and quality are often very quick discussions; much of the time they’ve approached us because they’re already convinced that Harlequin can do what they need. In the remaining cases we tend to jointly agree that the best way for them to be convinced is for them to take a copy of Harlequin Core and to run their own tests. There’s nothing quite like trying something on your own systems to give yourself confidence in the results.

So that leaves capabilities.

If the company already sells a DFE using a different core RIP they will almost always want to at least match, and usually to extend, the functionality of their existing solution when they switch to Harlequin. And if they’re building their first DFE they usually have a clear idea of what their target market will need.

At that stage we start by ensuring that we all understand that Harlequin Core can deliver rasters in whatever format is required (color channels, interleaving, resolution, bit depth, halftoning) and then cover color management pretty quickly (yes, Harlequin uses ICC profiles, including v4 and DeviceLink; yes, you can chain multiple profiles in arbitrary sequences, etc).

Then we usually come on to a series of questions that boil down to handling spot colors:

  • Most spot separations in jobs will be emulated on my digital press; can I adjust that emulation?
  • Can I make sure that the emulation works well with ICC profiles for different substrates?
  • Can I include special device colorants, such as White and Silver inks in that emulation?
  • Can I alias one spot separation name to another?
  • Can I make technical separations, like cut and fold lines, completely disappear, without knocking out if somebody upstream didn’t set them to overprint?
  • Alternatively, can I extract technical separations as vector graphics to drive a cutter/plotter with?

Since the answer to all of those is ‘yes’ we can then move on to areas where the vendor is looking for a unique capability …

But I’ve always been slightly disappointed that we don’t get to talk more about some of the interesting corners of spot handling in Harlequin. So I created a video to walk through some examples. Take a look, and I’d welcome your comments and questions!

Further reading:

  1. Channelling how many spot colors?!!
  2. Shade and color variation in textile printing
  3. Harlequin Core – the heart of your digital press
  4. What is a raster image processor 

Be the first to receive our blog posts, news updates and product news. Why not subscribe to our monthly newsletter? Subscribe here

Follow us on LinkedInTwitter and YouTube