Is your printer software up to the job? The impact of rising data rates on software evolved from traditional print processes

Direct™ product manager Ian Bolton explores the impact of using software that has evolved from traditional print processes to drive digital inkjet presses as they advance to print faster, in higher resolution, a wider variety of colors and applications. In particular, Ian focuses on the impact that rising data rates have on the workflow:

Digital press software evolved from traditional print processes has already reached its limit. Digital presses are becoming higher resolution – most are moving from 600 dpi to 1200 dpi, quadrupling the data. They’re also becoming deeper, with up to 7 drop sizes – and these drops are being made from a wider variety of colors. Digital presses are also becoming wider, up to 4 meters wide, and faster,  up to 1,000 feet per minute!

And what if you need to print where every item is different? For example, fully personalized – like curtains, flooring, wall coverings, clothing etc. All of these require software that can deliver ultra-high data rates.

Let’s look at how those data rates scale up as digital presses advance:
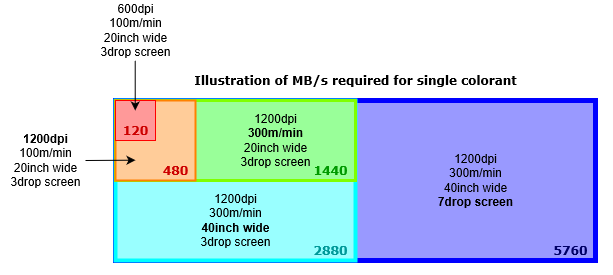
The next generation presses demand ultra-high data rates


If we start with 600 dpi, 20 inches wide, 3 drop sizes and 100 m per minute, then that’s 120 MBps per colorant, which is not too challenging. But once we move up to 1200 dpi, we’ve now quadrupled the data to 480 MBps, which is the read speed of all but the most bleeding-edge solid state drives today.

With printhead, nozzle and roller technology improving, the rated speeds also increase, so what happens when we go up to 300 m per min? It’s now 1.4 GBps and you will need one of those bleeding-edge solid state drives to keep up, bearing in mind you will now be writing as well as reading.

And if we go wider to print our wallcoverings at 40 inches wide, we’re now at 2.8 GBps … and we want our walls to look great close up, so we might be using 7 drop sizes, which takes us up to 5.7 GBps … and this is all just for one colorant!

Based on these numbers, it should be clear now that, for this generation of digital presses and beyond, a disk-based workflow just isn’t going to cut it: reading and writing this amount of data to disk would not actually be fast enough and would require ridiculous amounts of physical storage. This is where software evolved from traditional workflows hits a barrier: the data rate barrier.

To solve this we need to go back to the drawing board. It’s similar to the engineering challenge of moving from propeller-driven aircraft to jets that could break the sound barrier. Firstly, you need to develop a new engine and then you need to commercialize it.

So, if you’re looking for software to power your first or next digital press it’s going to need the right  kind of software engine that isn’t based on disk technology so that you can drive your digital press electronics directly and smash through the data rate barrier. In other words, you need to go Direct.

To learn more about the impact of rising data rates and how you can futureproof your next digital press, visit our website to find out more about going Direct.

If you’re interested in calculating data rates take a look at this blog post where you can download your own data rate calculator: Choosing the class of your raster image processor

Further reading:

  1. Harlequin Core – the heart of your digital press
  2. What is a raster image processor 
  3. Ditch the disk: a new generation of RIPs to drive your digital press
  4. Is your printer software up to the job?
  5. Where is screening performed in the workflow
  6. What is halftone screening?
  7. Unlocking document potential
  8. Future-proofing your digital press to cope with rising data rates

About the author

Ian Bolton, Product Manager, Direct
Ian Bolton, Product Manager – Direct
Ian has over 15 years’ experience in industry as a software engineer focusing on high performance. With a passion for problem-solving, Ian’s role as product manager for the Direct™ range gives him the opportunity to work with printer OEMs and break down any new technology barriers that may be preventing them from reaching their digital printer’s full potential.

To be the first to receive our blog posts, news updates and product news why not subscribe to our monthly newsletter? Subscribe here

Follow us on LinkedInTwitter and YouTube

Image Access joins the Global Graphics Software Partner Network

Image Access offers book, flatbed, sheetfeed, duplex & art scanners for digitizing large format originals for archives, libraries, museums & industry.

Leading German scanner manufacturer Image Access GmbH has joined the Global Graphics Software Partner Network as a technology partner. The two companies began working together last year to develop a solution that would enable printer vendors to implement a new family of Image Access line scan bars called WideSCAN into their printers to support the creation of PrintFlat™ calibrations. The WideSCAN scan bars, together with PrintFlat, will dramatically increase print quality with minimal impact on overall production time.

PrintFlat technology maximizes the print quality of your printer by addressing common defects found in inkjet printing, including banding and stripes, as well as mottling, streaking and chaining. By adding PrintFlat to a print workflow it helps to boost printer sales and reduce support calls for OEMs by expanding the range of printable jobs and consistently achieving exceptional image quality.

For the PrintFlat process to work, printed target pages need to be scanned and the resultant image data fed into the PrintFlat solution. This is where the Image Access partnership comes into play: the WideSCAN scan bars will be available in various sizes in 12-inch increments, starting at 24 inches, and are the most compact and easy-to-use line scan bars in the industry.

Justin Bailey, managing director of Global Graphics Software commented: “Image Access are known for their experience and innovative use of emerging camera technologies and I’m really pleased to welcome them to our Partner Network. Introducing the new WideSCAN scan bar is a game changer for printer manufacturers. Now they will be able to implement the scan bar into the printer so that calibration and PrintFlat correction can all be done inline on the printer, making that device PrintFlat Ready.”

Image Access has manufactured wide format scanners, including brands Bookeye® and WideTEK®, for more than 25 years.

If you’re interested in joining the Partner Network visit our website to find out more.


How do I choose the right PC specification for my digital press workflow?

When planning the implementation of your first or next digital press, the PC specification you choose to run your software workflow will play an important part in the data rates you will be able to achieve. Assuming you are not bottlenecked by disk drive performance due to requiring intermediate disk accesses, you can generally expect data rates to rise with the computational power of your PC.

It might therefore make sense to review the PassMark scores for a range of CPUs within your budget and make your choice based on that, but this alone won’t be enough to tell you whether you’ll be able to drive your printer at full rated speed. Similarly, you may already have an existing PC system in mind but need to know if it will be powerful enough for your new requirements.

Ideally, you could set up an evaluation system to run some typical print jobs to get a definitive answer, but this could be costly and labor-intensive, especially if this is your first digital press.

It’s for this reason we created Direct Benchmark™: an analysis tool that exercises Harlequin Direct™, our ultra-high data rate RIPping and screening solution, with your choice of press configuration and print jobs, stepping through a tuning cycle to obtain a series of data rates and line speeds that can be achieved.

There are two main ways Direct Benchmark can help you: firstly, if you have an existing PC system to run on, you can install Direct Benchmark and gather your own results; secondly, you could base your decision on a database of Direct Benchmark results we are gathering here at Global Graphics Software from running a variety of jobs on a range of PC specifications.

Running Direct Benchmark yourself

Whilst a real Harlequin Direct system would be connected to printhead electronics and driving your press directly, the Harlequin Direct invoked by Direct Benchmark doesn’t require this connection. This makes it very quick and easy to install and start gathering performance numbers. The screenshot below shows the settings you can use to reflect your printer configuration and define the print jobs to benchmark.

During benchmarking, you will be presented with a screen showing statistics for each run and a real-time graph of data rate at the bottom, and then you will be able to export the results at the end. If you would like to see Direct Benchmark in action, you can view a short demo here:

Using the Direct Benchmark database

If you aren’t in a position to run Direct Benchmark yourself, we are in the process of gathering results for a range of press configurations and print jobs, running on a variety of PC hardware specifications. This is being conducted in conjunction with Proactive Technologies, who are providing access to some of the machines we’re using. Whilst it is too early to draw any conclusions or share our results at this stage, if you have some typical print jobs and a press configuration in mind, please get in touch with me, ian.bolton@globalgraphics.com, because we may be able to generate the results for you.

For more information about Direct, please visit globalgraphics.com/direct

To be the first to receive our blog posts, news updates and product news why not subscribe to our monthly newsletter? Subscribe here

Follow us on LinkedIn and Twitter

About the author:

Ian Bolton, Product Manager, Direct
Ian Bolton, Product Manager – Direct

Ian has over 15 years’ experience in industry as a software engineer focusing on high performance. With a passion for problem-solving, Ian’s role as product manager for the Direct range gives him the opportunity to work with printer OEMs and break down any new technology barriers that may be preventing them from reaching their digital printer’s full potential.


Improve inkjet output quality with PrintFlat™

If you print on an inkjet press you’ll know that the problem of non-uniformity or banding is a particularly difficult one to resolve. It’s especially acute on areas of flat tints with the result that printed output is unacceptable to you and to your customers. This means you either don’t run certain jobs on your inkjet press or, in some sectors of the market, are forced to sell your output at a discount.

The good news is that with PrintFlat you have a solution that is quick to deploy and cost-effective, and it can be applied to any workflow with or without a RIP. With more press vendors adopting this technology, watch our new explainer video to see how you might benefit.

Find out more about PrintFlat here.


Where is screening performed in the workflow?

In my last post I gave an introduction to halftone screening. Here, I explain where screening is performed in the workflow:


Halftone screening must always be performed after the page description language (such as PDF or PostScript) has been rendered into a raster by a RIP … at least conceptually.

In many cases it’s appropriate for the screening to be performed by that RIP, which may mean that in highly optimized systems it’s done in parallel with the final rendering of the pages, avoiding the overhead of generating an unscreened contone raster and then screening it. This usually delivers the highest throughput.

Global Graphics Software’s Harlequin RIP® is a world-leading RIP that’s used to drive some of the highest quality and highest speed digital presses today. The Harlequin RIP can apply a variety of different halftone types while rendering jobs, including Advanced Inkjet Screens™.

But an inkjet press vendor may also build their system to apply screening after the RIP, taking in an unscreened raster such as a TIFF file. This may be because:

  • An inkjet press vendor may already be using a RIP that doesn’t provide screening that’s high enough quality, or process fast enough, to drive their devices. In that situation it may be appropriate to use a stand-alone screening engine after that existing RIP.
  • To apply closed loop calibration to adjust for small variations in the tonality of the prints over time, and to do so while printing multiple copies of the same output, in other words, without the need for re-ripping that output.
  • When a variable data optimization technology such as Harlequin VariData™ is being used that requires multiple rasters to be recomposited after the RIP. It’s better to apply screening after that recomposition to avoid visible artifacts around some graphics caused by different halftone alignment.
  • To access sophisticated features that are only available in a stand-alone screening engine such as Global Graphics’ PrintFlat™ technology, which is applied in ScreenPro™.

Global Graphics Software has developed the ScreenPro stand-alone screening engine for these situations. It’s used in production to screen raster output produced using RIPs such as those from Esko, Caldera and ColorGate, as well as after Harlequin RIPs in order to access PrintFlat.

Achieve excellent quality at high speeds on your digital inkjet press: The ScreenPro engine from Global Graphics Software is available as a cross platform development component to integrate seamlessly into your workflow solution.

The above is an excerpt from our latest white paper: How to mitigate artifacts in high-speed inkjet printing. Download the white paper here.

For further reading about the causes of banding and streaking in inkjet output see our related blog posts:

  1. Streaks and Banding: Measuring macro uniformity in the context of optimization processes for inkjet printing

  2. What causes banding in inkjet? (And the smart software solution to fix it.)

Be the first to receive our news updates and product news. Why not subscribe to our monthly newsletter? Subscribe here

Follow us on LinkedIn and Twitter

What is halftone screening?

Halftone screening, also sometimes called halftoning, screening or dithering, is a technique to reliably produce optical illusions that fool the eye into seeing tones and colors that are not actually present on the printed matter.

Most printing technologies are not capable of printing a significant number of different levels for any single color. Offset and flexo presses and some inkjet presses can only place ink or no ink. Halftone screening is a method to make it look as if many more levels of gray are visible in the print by laying down ink in some areas and not in others, and using such a small pattern of dots that the individual dots cannot be seen at normal viewing distance.

Conventional screening, for offset and flexo presses, breaks a continuous tone black and white image into a series of dots of varying sizes and places these dots in a rigid grid pattern. Smaller dots give lighter tones and the dot sizes within the grid are increased in size to give progressively darker shades until the dots grow so large that they tile with adjacent dots to form a solid of maximum density (100%). But this approach is mainly because those presses cannot print single pixels or very small groups, and it introduces other challenges, such as moiré between colorants and reduces the amount of detail that can be reproduced.

Most inkjet presses can print even single dots on their own and produce a fairly uniform tone from them. They can therefore use dispersed screens, sometimes called FM or stochastic halftones.

A simple halftone screen
A simple halftone screen.


A dispersed screen uses dots that are all (more or less) the same size, but the distance between them is varied to give lighter or darker tones. There is no regular grid placement, in fact the placement is more or less randomized (which is what the word ‘stochastic’ means), but truly random placement leads to a very ‘noisy’ result with uneven tonality, so the placement algorithms are carefully set to avoid this.

Inkjet is being used more and more in labels, packaging, photo finishing and industrial print, all of which often use more than four inks, so the fact that a dispersed screen avoids moiré problems is also very helpful.

Dispersed screening can retain more detail and tonal subtlety than conventional screening can at the same resolution. This makes such screens particularly relevant to single-pass inkjet presses, which tend to have lower resolutions than the imaging methods used on, say, offset lithography. An AM screen at 600 dots per inch (dpi) would be very visible from a reading distance of less than a meter or so, while an FM screen can use dots that are sufficiently small that they produce the optical illusion that there are no dots at all, just smooth tones. Many inkjet presses are now stepping up to 1200dpi, but that’s still lower resolution than a lot of offset and flexo printing.

This blog post has concentrated on binary screening for simplicity. Many inkjet presses can place different amounts of ink at a single location (often described as using different drop sizes or more than one bit per pixel), and therefore require multi-level screening. And inkjet presses often also benefit from halftone patterns that are more structured than FM screens, but that don’t cluster into discrete dots in the same way as AM screens.


The above is an excerpt from our latest white paper: How to mitigate artifacts in high-speed inkjet printing. Download the white paper here.

Questions from the Inkjet Conference, Düsseldorf

The Inkjet Conference Düsseldorf has been and gone for another year and we’re already looking ahead to the 2019 events that will be organised by ESMA.

This year delegates in the audience were able to submit questions via an app for the first time. I’m grateful to the IJC for sending me the questions that we either didn’t have time to cover after my presentation, or that occurred subsequently. So here they are with my responses:

Is it possible to increase the paper diversity with software by e.g.  eliminating paper related mottling?

Yes, we have yet to come across a media/ink combination ScreenPro™ will not work well with. The major artefact we correct for is mottle. This may mean you can print satisfactory results with ScreenPro on papers where the mottle was unacceptable previously, so increasing the diversity of papers that can be used.

It sounds like ScreenPro is very good at tuning a single machine. How do you also then match that output quality among several machines?

There are two technologies in ScreenPro, the screening core itself with the Advanced Inkjet Screens (AIS), and PrintFlat™ to correct for cross web banding. ScreenPro generally improves print quality and Mirror and Pearl screens (AIS) work in the majority of screening situations. PrintFlat, however, needs to be tuned to every press and if the press changes significantly over time, if a head is changed for example, it will have to be recalibrated. This calibration actually makes subsequent ink linearization and colour profiling more consistent between machines as you have removed the cross-web density fluctuations (which are machine specific) from the test charts used to generate these profiles.

“We haven’t found ink or substrate that we couldn’t print with.” Does this include functional materials, such as metals, wood, rubber? or is it limited to cmyk-like processes?

No – with ScreenPro we have only worked with CMYK-like process colours, i.e. print that is designed to be viewed with colour matching etc. ScreenPro is designed to improve image quality and appearance. I see no reason why ScreenPro would not work with functional materials but I would like to understand what problems it is trying to solve.

What is the main innovation of the screening software in terms of how it works as opposed to what it can do?

“How it works” encompasses placing the drops differently on the substrate in order to work around common inkjet artefacts. The innovation is therefore in the algorithms used to generate the screens.

Advanced Inkjet Screens are standard in the ScreenPro screening engine


ScreenPro™ makes a real impact on those hard-to-solve killer jobs

By Tom Mooney, product manager for Global Graphics Software

I’ve just returned from a road trip in the US to inkjet press manufacturers who are all interested in using ScreenPro.

The meetings have gone in a very similar manner with the opening line: “We have a print shop that wants to print this job, but take a look at this area.” They point to an area of the image, usually in the shadows, and it is either a muddy brown mess or crusty and flaky, the typical ‘orange peel’ effect. We all agree the print is unacceptable and cannot be sold, so we discuss what can be done.

Firstly, we look at the ink limitation, but this kills the color saturation in the rest of the print. We look at color management and under color removal, but this only moves the problem to a different area on the image.

Then we see what ScreenPro can do.

We try our Advanced Inkjet Screens™ and use Pearl screen on the muddy mess and Mirror on the orange peel. This does the trick and makes the prints acceptable, so the print shop can sell that print job.

As long as this quality threshold is met the customer is happy. This quality is achieved by a combination of hardware, media and ink and software. Color management is only part of the story with the software – ScreenPro makes a real impact on those hard-to-solve killer jobs.

ScreenPro’s Advanced Inkjet Screens solve two common problems: Mirror avoids orange peel mottle on non-absorbent, poorly wettable substrates and Pearl counteracts streaking on reasonably absorbent and/or wettable substrates


A problem solved

They say a problem shared is a problem halved. Well, two weeks on from our launch of our Advanced Inkjet Screens it’s been gratifying to see how much the discussion of inkjet output quality has resonated among the press vendor community.

Advanced Inkjet Screens are standard in the ScreenPro screening engine

Just in case you missed it, we’ve introduced a set of screens that mitigate the most common artifacts that occur in inkjet printing, particularly in single-pass inkjet but also in scanning heads. Those of you who’ve attended Martin Bailey’s presentations at the InkJet Conference ( The IJC) will know that we’ve been building up to making these screens available for some time. And we’ve worked with a range of industry partners who’ve approached us for help because they’ve struggled to resolve problems with streaking and orange peel effect on their own.

Coalescence on inkjet is directional and leads to visible streaks.

Well, now Advanced Inkjet Screens are available as standard screens that are applied by our ScreenPro screening engine. They can be used in any workflow with any RIP that allows access to unscreened raster data, so that’s any Adobe PDF RIP including Esko. Vendors can replace their existing screening engine with ScreenPro to immediately benefit from improved quality, not to mention the high data rates achievable. We’ve seen huge improvements in labels and packaging workflows. Advanced Inkjet Screens are effective with all the major inkjet printheads and combinations of electronics. They work at any device resolution with any ink technology.

Why does a halftone in software work so well? Halftones create an optical illusion depending on how you place the dots. Streaking or graining on both wettable and non-absorbent substrates can be corrected. Why does this work in software so well? Halftoning controls precisely where you place the dots. It just goes to show that the assumption that everything needs to be fixed in hardware is false. We’ve published a white paper if you’re interested in finding out more.

The Mirror screen mitigates the orange peel effect common when printing onto tin cans, plastics, or flexible packaging

Getting to know PDF 2.0: not only but also!

Are you ready for PDF 2.0? Register now for the PDF 2.0 interoperability workshops in the UK and USA.

In the middle of 2017 ISO 32000-2 will be published, defining PDF 2.0.  It’s eight years since there’s been a revision to the standard. We’ve already covered the main changes affecting print in previous blog posts and here Martin Bailey, the primary UK expert to the ISO committee developing PDF 2.0, gives a roundup of a few other changes to expect.

Security
The encryption algorithms included in previous versions of PDF have fallen behind current best practices in security, so PDF adds AES-256-bit and states that all passwords used for AES-256 encryption must be encoded in Unicode.
A PDF 1.7 reader will almost certainly error and refuse to process any PDF files using the new AES-256 encryption.
Note that Adobe’s ExtensionLevel 3 to ISO 32000-1 defines a different AES-256 encryption algorithm, as used in Acrobat 9 (R=5). That implementation is now regarded as dangerously insecure and Adobe has deprecated it completely, to the extent that use of it is forbidden in PDF 2.0.
Deprecation and what this means in PDF!
PDF 2.0 has deprecated a number of implementation details and features that were defined in previous versions. In this context ‘deprecation’ means that tools writing PDF 2.0 are recommended not to include those features in a file; and that tools reading PDF 2.0 files are recommended to ignore those features if they find them.
Global Graphics has taken the deliberate decision not to ignore relevant deprecated items in PDF files that are submitted and happen to be identified as PDF 2.0. This is because it is quite likely that some files will be created using an older version of PDF and using those features. If those files are then pre-processed in some way before submitting to Harlequin (e.g. to impose or trap the files) the pre-processor may well tag them as now being PDF 2.0. It would not be appropriate in such cases to ignore anything in the PDF file simply because it is now tagged as PDF 2.0.
We expect most other PDF readers to take the same course, at least for the next few years.
And the rest…
PDF 2.0 header: It’s only a small thing, but a PDF reader must be prepared to encounter a value of 2.0 in the file header and as the value of the Version key in the Catalog.
PDF 1.7 readers will probably vary significantly in their handling of files marked as PDF 2.0. Some may error, others may warn that a future version of that product is required, while others may simply ignore the version completely.
Harlequin 11 reports “PDF Warning: Unexpected PDF version – 2.0” and then continues to process the job. Obviously that warning will disappear when we ship a new version that fully supports PDF 2.0.
UFT-8 text strings: Previous versions of PDF allowed certain strings in the file to be encoded in PDFDocEncoding or in 16-bit Unicode. PDF 2.0 adds support for UTF-8. Many PDF 1.7 readers may not recognise the UTF-8 string as UTF-8 and will therefore treat it as using PDFDocEncoding, resulting in those strings being treated as what looks like a random sequence of mainly accented characters.
Print scaling: PDF 1.6 added a viewer preferences key that allowed a PDF file to specify the preferred scaling for use when printing it. This was primarily in support of engineering drawings. PDF 2.0 adds the ability to say that the nominated scaling should be enforced.
Document parts: The PDF/VT standard defines a structure of Document parts (common called DPart) that can be used to associate hierarchical metadata with ranges of pages within the document. In PDF/VT the purpose is to enable embedding of data to guide the application of different processing to each page range.
PDF 2.0 has added the Document parts structure into baseline PDF, although no associated semantics or required processing for that data have been defined.
It is anticipated that the new ISO standard on workflow control (ISO 21812, expected to be published around the end of 2017) will make use of the DPart structure, as will the next version of PDF/VT. The specification in PDF 2.0 is largely meaningless until such time as products are written to work with those new standards.


The background
The last few years have been pretty stable for PDF; PDF 1.7 was published in 2006, and the first ISO PDF standard (ISO 32000-1), published in 2008, was very similar to PDF 1.7. In the same way, PDF/X‑4 and PDF/X‑5, the most recent PDF/X standards, were both published in 2010, six years ago.
In the middle of 2017 ISO 32000-2 will be published, defining PDF 2.0. Much of the new work in this version is related to tagging for content re-use and accessibility, but there are also several areas that affect print production. Among them are some changes to the rendering of PDF transparency, ways to include additional data about spot colors and about how color management should be applied.