In this second post about digital watermarking in the print workflow, author Martin Bailey explains the stages when it’s possible to add a digital watermark.
Digital watermarking is an emerging technology, part of the latest step on the evolution of product identification. Global Graphics Software has partnered with Digimarc, a leader in digital watermarking and a member of our Partner Network, to explore this topic and future developments.
Adding a digital watermark during the design stage
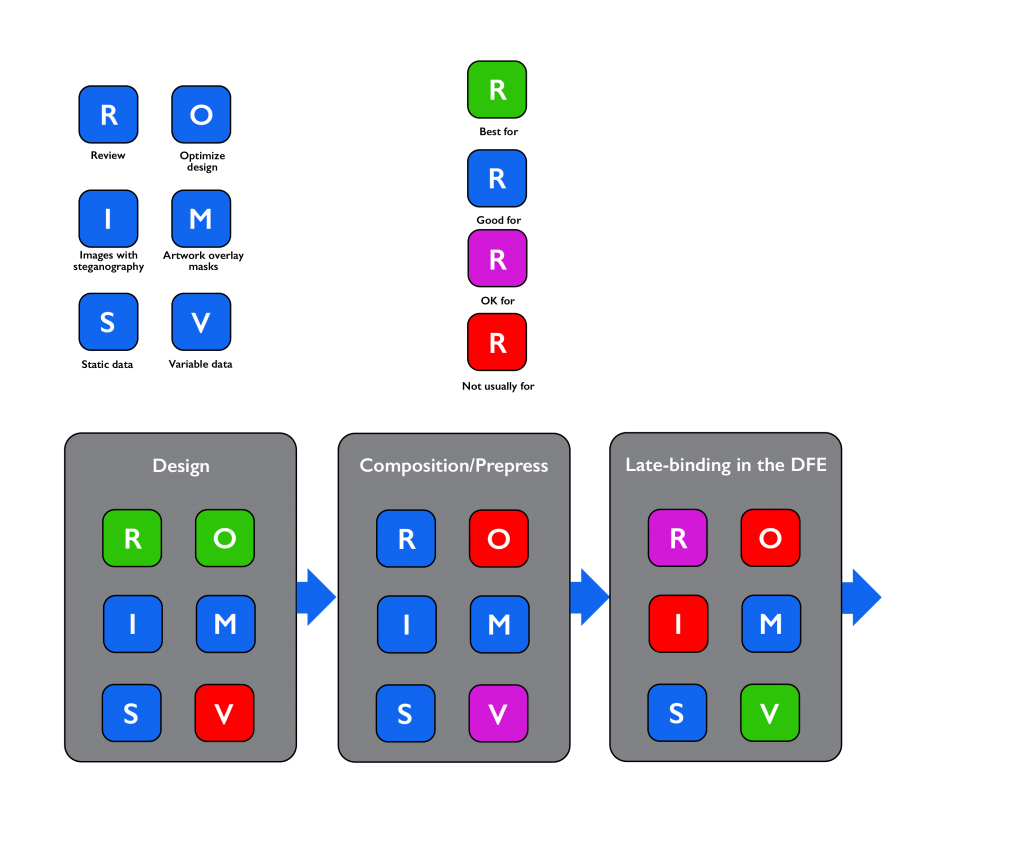
In some workflows the designer may apply digital watermarks to a design by, for instance, using a plugin to an application such as Adobe Illustrator. This is equally appropriate for both steganography and an artwork masking layer, and gives the maximum opportunity for approval of the design with the digital watermark in place, and for any rework to the design that might be requested to realize the greatest benefit from using that watermark.
It will not normally be appropriate for the digital watermark to be added by the designer if each instance of the print requires unique data to be encoded in it; variable data composition is usually performed later in the workflow.

Adding a digital watermark in composition/prepress
In other workflows adding the digital watermark may be a function of a variable data composition or prepress department. Just as for application by the designer, this is applicable for both steganography and an artwork masking layer. There is a reasonable opportunity for approval of the design with the digital watermark in place. But it would be slower and more expensive to rework the design if that is required at this stage than if the watermark were added by the designer.
If the digital watermark is added in prepress then it can carry both static and variable data. As discussed above, however, variable data is best suited to use of an artwork masking layer rather than steganography, if only because of the amount of data that must be generated and then incorporated into a PDF file when steganography is used for a significant number of unique codes.
But applying even an artwork masking layer in prepress does bulk up the resulting print-ready PDF file with many copies of that layer, each one carrying different data. And it can also slow down processing in the Digital Front End (DFE) for a digital press. An overprinted graphic covering large areas of each piece of output in the PDF file can make it harder for the variable data optimization in a DFE to break the design apart so that it can minimize the total amount of processing required to read, color manage, render and halftone screen the job. (See Global Graphics Software’s guide: Full Speed Ahead: How to make variable data PDF files that won’t slow your digital press.)
Late-binding in the Digital Front End (DFE)
A new development in the application of digital watermarking is to add the marks right at the very last minute before the data is printed. In our SmartDFE™, for example, this can be done in parallel with or after the color management and rendering.
Applying the watermarks in parallel with color management and rendering (in the RIP) allows full access to all color channels for the output, while also removing the need to generate a fully resolved “optimized PDF” or PDF/VT file containing all of the variable data further upstream. In turn, this can reduce the overhead of optimizing variable data processing in the RIP. The final result is increased throughput, both in composition/prepress and in the DFE.
Applying marks after the RIP enables even higher performance through the DFE, with the added benefit of providing a more predictable processing speed because the amount of processing required is more deterministic than is rendering PDF. This might restrict the watermark to be painted in only one color channel, though.
Increasing speed and predictability in the DFE allows the use of lower cost hardware in those DFEs, or assists with printing at full engine speed for a larger proportion of jobs.
Late-binding application of digital watermarks will also always occur in an environment where the characteristics of the press that will be used to print the items are known, including resolution, bitdepth etc.
These benefits make this the optimum choice for highly efficient printing workflows for variable data digital watermarks, driving digital presses at full engine speed. The trade-offs are that it’s a little harder to review and approve proofs of the output, and that use for images with steganography is not usually appropriate.
This is an excerpt from the white paper: Optimizing Digital Watermarking in Print Workflows. To learn more about digital watermarking download your copy:
DOWNLOAD YOUR COPY OF THE WHITE PAPER

About the author

Martin Bailey, former distinguished technologist at Global Graphics Software, is currently the primary UK expert to the ISO committees maintaining and developing PDF and PDF/VT. He is the author of Full Speed Ahead: how to make variable data PDF files that won’t slow your digital press, a guide offering advice to anyone with a stake in variable data printing including graphic designers, print buyers, composition developers and users.
Further reading
To be the first to receive our blog posts, news updates and product news why not subscribe to our monthly newsletter? Subscribe here
Follow us on LinkedIn, Twitter and YouTube
