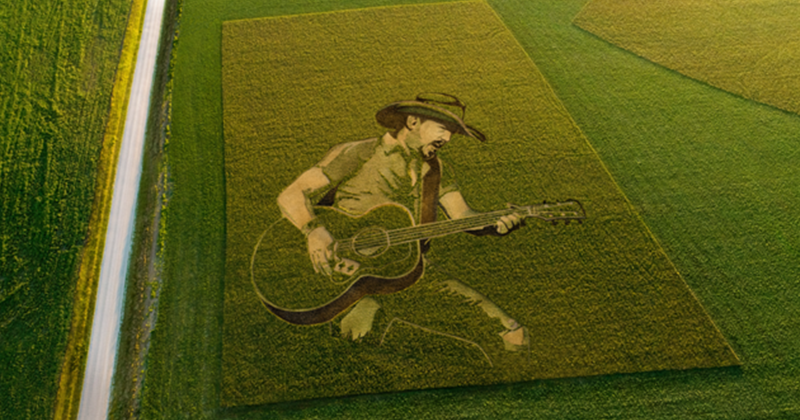
I finally made time for a very overdue tidy of my filing cabinet yesterday. In between wondering why I still had receipts from travel in 2003, I tripped over a piece of history: it’s a Harlequin Harpoon board, a hardware accelerator for halftone screening and part of the technology that allowed Harlequin to become the first to RIP the Seybold Musicians’ speed test page in under 60 seconds.
A Harlequin Harpoon board, a hardware accelerator for halftone screening.
Speed is still a key focus for Global Graphics Software, but the Harpoon was designed for screening for offset plates, and developments in chips and compilers by Intel, AMD, Microsoft and others, together with further optimizations to Global Graphics Software code, removed the need for custom hardware for that use case fairly soon afterwards.
Today’s challenge is much more for digital presses, and especially for inkjet. Current press speeds make the idea of celebrating RIPping and screening a single page in less than a minute seem quaint and even slightly bizarre; very last millennium! The fastest digital presses now print well over the equivalent of 10,000 pages per minute, often with every page different, which means that at least something on every page must be RIPped and screened, at full engine speed.
For that kind of performance, or even a more common 100 m/min for a narrow-web label press, it’s now normal to use multiple RIPs in parallel and to share the pages out between them. This makes it tricky to use custom hardware unless that is tied to specific ink channel delivery, because otherwise it must be load-balanced in a way that complements the load-balancing across the RIPs. We still see some custom hardware associated with raster delivery to the heads in the press, but nowhere else in current systems.
For the same reason, increasing the raw speed of a single RIP is no longer a target; scheduling pages to each RIP in a cluster and managing the rasters delivered by each one, together with managing the interactions between those multiple RIPs, are far more important. System engineering is now a key part of being able to drive inkjet presses at full speed without an unfeasibly high bill of materials for the Digital Front End, almost as much as the core technologies themselves.
In other words Global Graphics’ Direct™ and SmartDFE™ technologies are the logical successors of the Harpoon board, bringing affordable and reliable speed to a new generation of printing technology. But there’s still something rather nice in being able to hold a physical piece of history in my hands!
About the author
Martin Bailey, Distinguished Technologist, Global Graphics Software, is currently the primary UK expert to the ISO committees maintaining and developing PDF and PDF/VT and is the author of Full Speed Ahead: how to make variable data PDF files that won’t slow your digital press, a new guide offering advice to anyone with a stake in variable data printing including graphic designers, print buyers, composition developers and users.
Be the first to receive our blog posts, news updates and product news. Why not subscribe to our monthly newsletter? Subscribe here
With fewer design limitations, a faster turnaround, no minimum run length and higher margins (not to mention reduced use of power and water, and of pollution), it’s not surprising that the digitally printed textile market is growing.1 Inkjet has certainly made textile design and printing much more flexible than screen printing – and that goes for everybody involved, from the designer through the printing company, to the buyer.
But printing textiles on inkjet doesn’t come without its challenges: as a software provider focusing on print quality issues, we often hear from print service providers who can only digitally print two thirds of the jobs they receive because they would not be paid for the quality they could achieve on the others.
Shade or color variation is a common problem. It’s not new in digital printing (it’s always been an issue for screen-printed and dyed textiles as well) and is usually managed by providing a shade band, which printer operators refer to, to check allowable color variations between pieces.
But, unlike screen-printing or dyeing, the color variation on an inkjet press can be visible over a small distance, just a few centimeters, and this results in visible bands across the output. Banding describes features that tend to be 1 – 10 cm across and they’re often caused by variation of inkjet pressure or voltage differences within the head, which typically results in a frown or smile shape. We also see a certain amount of manufacturing variation between heads so that one may print lighter or darker than the head next to it in a print bar. Some types of heads can also wear in use, which can result in less regular banding that can change over time. This means that large areas which should be flat color may not be.
When such a variation occurs it can greatly complicate a lot of post-print steps, especially if you need to put more than one piece of textile together, either in sewing or use (such as a pair of curtains). If that’s the case, then a significant difference may be unacceptable and your printing rejected by your buyer. Ultimately this leads to print service providers rejecting jobs, because they know their digital press can’t handle printing those tricky flat tints or smooth tones.
What can you do about it? The first thing many companies do to try to overcome this banding is to adjust the voltage to the inkjet head, but this is often time-consuming and expensive because it requires an expert technician. A better alternative is to make the correction in software, which is a more cost-effective and faster solution. It means it can be automated and can act at a much finer granularity, so printing is more accurate. There’s no need to mess with controls that could damage the press, and printing companies themselves can make corrections without the vendor sending a technician on-site.
Our solution at Global Graphics Software for improving banding is PrintFlat™. It corrects tonality to hide banding based on measurements from the press. It adjusts every nozzle separately and doesn’t need a specialist engineer to make press adjustments. PrintFlat can be integrated into different digital front ends, using a variety of RIPs, including Caldera and Colorgate and, not to mention, our own Harlequin RIP®.
Over the years of working with many press manufacturers we’ve discovered that many technical issues and solutions are common across different sectors, including transactional, wide-format, commercial, labels and packaging, and industrial, including ceramics, wall coverings, flooring and of course textiles. That means that we already have years of experience in correcting for banding. Using PrintFlat in your press means print service providers can now take on those jobs they would normally reject.
To learn more about how to eliminate shade and color variation when printing on an inkjet press, listen to Global Graphics Software’s CTO Martin Bailey’s talk for FESPA 2020:
Digitally printed textiles are estimated to be between 2% – 5% of the total printed textiles market. Estimated at $146.5 billion in 2018 by Grand View Research
Banding, or non-uniformity, is a common problem in inkjet printing that can often result in print production downtime and loss of revenue. In this post, I’ll discuss the challenges printer OEMs and print service providers face when trying to reduce banding and provide an insight into the work we’ve been doing at Global Graphics Software to remove banding and streaking artifacts from the print output, enhancing print quality and raising productivity.
What causes banding in inkjet?
Inkjet printheads produce variable density output both across an individual printhead (known as the inkjet ‘smile’) and when comparing output from one printhead with another. The output from a printhead can also change with time, as the printhead wears or ages. Additionally, the overlapping stitch area between printheads in a single-pass printer, or between overlapping passes in a multi-pass printer, can also cause density variations. Such variable density becomes visible in the printed output as ‘banding’ and ‘stripes’, and means that it is not possible for print providers to digitally print jobs with certain image features (such as flat areas or gradients), or that they must sell the lower quality output produced at a significant discount.
Why is uniformity in inkjet a challenge?
Fixing banding or streaking in inkjet is not without its challenges:
In the printer design phase, the use of interlacing in the printing process can be effective at reducing banding and improving uniformity, but significantly impacts the speed and/or cost of the printer. This approach is especially undesirable in single-pass systems, where the only option to interlace is by doubling the quantity, and hence cost, of printheads in the printer.
Currently most OEMs attempt to correct uniformity issues with hardware solutions such as drive voltage tuning, but these give only limited improvement and are slow, complex and costly to implement. Most printheads have only limited voltage adjustment for banks of many nozzles together, or even the entire printhead as a whole, and do not allow adjustment of drive voltage for individual nozzles – such adjustment does not have the granularity necessary to really eliminate banding. Additionally, adjusting drive voltage to balance output density (drop volume), is undesirable as this is likely to negatively impact drop velocity, printing reliability (jetting stability) and even printhead lifetime. As the printer performance changes over time, and when printheads are replaced, service and support engineers must spend a significant amount of time onsite re-making these complex adjustments to achieve quality that is, at best, a compromise.
A solution in software
Global Graphics Software has been working with printer OEMs and print service providers to significantly enhance the quality of their inkjet output, one such company being Ellerhold AG, a leading poster printing house and press manufacturer in Germany.
Ellerhold wanted to enhance the printing quality of it’s large-format posters. Specifically, the printheads on its digital printing machine showed variation in printed density both between the heads and across each head, which produced clearly visible bands within some types of printed output.
Together with Ellerhold we were able to enhance the quality of the printed output using our ScreenPro™ screening engine with PrintFlat™ technology. ScreenPro is a very fast and efficient multi-level screening engine that mitigates artifacts such as banding or streaking and mottling from the inkjet print process and can be used in any print workflow, including Adobe®, Caldera, Esko, EFI and Sofha, with any combination of inks, substrates, printheads and electronics. In ScreenPro every nozzle can be addressed separately on any head/electronics to achieve very fine granularity. The PrintFlat technology adjusts the density within ScreenPro to produce uniform density across a print bar, thereby optimizing print quality.
The project brought many technical challenges: As it was a multi-pass process we needed to efficiently capture repeating density variations across the entire print area in an unbiased way. We carried out tests, analyzed the scanned prints and created a PrintFlat calibration workflow for the press designed to compensate for the non-uniformity in output across the print bar. The team also used a variant of Global Graphics Software’s Advanced Inkjet Screens™, available with ScreenPro and the Harlequin RIP®, which they adapted specially for scanning-head systems. These proved very effective.
You can watch the short case study film here:
PrintFlat technology provided the ideal solution, giving smooth, uniform tints and accurate tone reproduction via a simple ‘fingerprint’ calibration of the screening process, where the density compensation is then built into the screen halftone definition. This means that the PrintFlat calibration is applied during the screening process at runtime and enhances the quality of your output without any compromise on speed. The PrintFlat approach addresses every individual nozzle, has no negative effect on other printing parameters, and allows drive voltage to be used to maximize printing stability and reliability instead.
A valuable additional benefit is in increasing overall productivity. Achieving higher quality with fewer print passes allows for greater use of faster print modes. Jobs that require 4-pass quality can be printed in 2-pass mode with PrintFlat.
The process can be automated for closed-loop correction and, unlike correction by adjustment of voltages, there is no effect on jetting stability or head lifetime, nor ink pressure and timing/drop speed variation.
PrintFlat can increase the added value of your service engineers’ visits, producing a much higher quality result in less time. Alternatively, the print service provider can operate the PrintFlat calibration process to maximize their output quality themselves.
Before and after images illustrating how effective PrintFlat technology is at improving print uniformity.
When we hear the phrase “big data”, we’re meant to think of extremely large data sets that are too complex to process in traditional ways. But, in the context of the next generation of digital presses, you’d be forgiven for thinking it refers to the ultra-high data rates required to drive them.
For example, consider a typical narrow-web label press: 13 inches (330mm) wide, 4 colors, 600x600dpi, running at 230 fpm (70m/min). This requires 0.9 GB/s of raster data to drive it at its rated speed.
Assuming next year’s press adds three more colors (Orange, Green and White) and is upgraded to 1200x1200dpi and expected to run a little faster at 330 fpm (100m/min), the required data rate will jump to 8.6 GB/s: almost a factor of ten increase!
Already this is a data rate far in excess of what the fastest solid-state drives can manage, so what hope is there for a traditional disk-based workflow when moving to 20 inches wide, duplex or 200m/min? Clearly, any part of the workflow involving a disk drive is going to become a bottleneck.
Ditch the disk. Rather than write intermediate raster files to disk between RIPping and screening, or between screening and the printhead electronics, everything takes place in memory.
This was one of the reasons behind the creation of Direct™, the integrated software pipeline we announced at the end of April. Rather than write intermediate raster files to disk between RIPping and screening, or between screening and the printhead electronics, everything takes place in memory.
There’s more to future-proofing your press than eliminating comparatively slow disk accesses, however. You’ll need a system that’s scalable and built from the fastest components, which is why Harlequin Direct™ is composed from a configurable number of Harlequin Host Renderer™ and ScreenPro™ instances working in parallel to make the best of the most powerful desktop PCs available.
When it comes to adding new colors or supporting duplex, the scalability extends to multiple Harlequin Directs across multiple PCs, one per printbar.
An added advantage of this approach is that each printbar need not use the same resolution or drop-count etc. For example, you might wish to use a lower resolution and disable color management for white or varnish. Our Press Operator Controller user interface is supplied to manage your configuration, along with submitting and controlling your print jobs.
The beauty of a software-only solution like Direct is that once you have built it into your workflow, you are free to upgrade your PCs over time for greater performance without any further software integration expense. A Direct-based system will evolve as your needs evolve, making it the ideal choice for future-proofing your next digital press.
To be the first to receive our blog posts, news updates and product news why not subscribe to our monthly newsletter? Subscribe here
Ian Bolton, Product Manager, Direct
About the author:
Ian has over 15 years’ experience in industry as a software engineer focusing on high performance. With a passion for problem-solving, Ian’s role as product manager for the Direct range gives him the opportunity to work with printer OEMs and break down any new technology barriers that may be preventing them from reaching their digital printer’s full potential.
In my last post I gave an introduction to halftone screening. Here, I explain where screening is performed in the workflow:
Halftone screening must always be performed after the page description language (such as PDF or PostScript) has been rendered into a raster by a RIP … at least conceptually.
In many cases it’s appropriate for the screening to be performed by that RIP, which may mean that in highly optimized systems it’s done in parallel with the final rendering of the pages, avoiding the overhead of generating an unscreened contone raster and then screening it. This usually delivers the highest throughput.
Global Graphics Software’s Harlequin RIP® is a world-leading RIP that’s used to drive some of the highest quality and highest speed digital presses today. The Harlequin RIP can apply a variety of different halftone types while rendering jobs, including Advanced Inkjet Screens™.
But an inkjet press vendor may also build their system to apply screening after the RIP, taking in an unscreened raster such as a TIFF file. This may be because:
An inkjet press vendor may already be using a RIP that doesn’t provide screening that’s high enough quality, or process fast enough, to drive their devices. In that situation it may be appropriate to use a stand-alone screening engine after that existing RIP.
To apply closed loop calibration to adjust for small variations in the tonality of the prints over time, and to do so while printing multiple copies of the same output, in other words, without the need for re-ripping that output.
When a variable data optimization technology such as Harlequin VariData™ is being used that requires multiple rasters to be recomposited after the RIP. It’s better to apply screening after that recomposition to avoid visible artifacts around some graphics caused by different halftone alignment.
To access sophisticated features that are only available in a stand-alone screening engine such as Global Graphics’ PrintFlat™ technology, which is applied in ScreenPro™.
Global Graphics Software has developed the ScreenPro stand-alone screening engine for these situations. It’s used in production to screen raster output produced using RIPs such as those from Esko, Caldera and ColorGate, as well as after Harlequin RIPs in order to access PrintFlat.
Achieve excellent quality at high speeds on your digital inkjet press: The ScreenPro engine from Global Graphics Software is available as a cross platform development component to integrate seamlessly into your workflow solution.
The above is an excerpt from our latest white paper: How to mitigate artifacts in high-speed inkjet printing. Download the white paper here.
For further reading about the causes of banding and streaking in inkjet output see our related blog posts:
Halftone screening, also sometimes called halftoning, screening or dithering, is a technique to reliably produce optical illusions that fool the eye into seeing tones and colors that are not actually present on the printed matter.
Most printing technologies are not capable of printing a significant number of different levels for any single color. Offset and flexo presses and some inkjet presses can only place ink or no ink. Halftone screening is a method to make it look as if many more levels of gray are visible in the print by laying down ink in some areas and not in others, and using such a small pattern of dots that the individual dots cannot be seen at normal viewing distance.
Conventional screening, for offset and flexo presses, breaks a continuous tone black and white image into a series of dots of varying sizes and places these dots in a rigid grid pattern. Smaller dots give lighter tones and the dot sizes within the grid are increased in size to give progressively darker shades until the dots grow so large that they tile with adjacent dots to form a solid of maximum density (100%). But this approach is mainly because those presses cannot print single pixels or very small groups, and it introduces other challenges, such as moiré between colorants and reduces the amount of detail that can be reproduced.
Most inkjet presses can print even single dots on their own and produce a fairly uniform tone from them. They can therefore use dispersed screens, sometimes called FM or stochastic halftones.
A simple halftone screen.
A dispersed screen uses dots that are all (more or less) the same size, but the distance between them is varied to give lighter or darker tones. There is no regular grid placement, in fact the placement is more or less randomized (which is what the word ‘stochastic’ means), but truly random placement leads to a very ‘noisy’ result with uneven tonality, so the placement algorithms are carefully set to avoid this.
Inkjet is being used more and more in labels, packaging, photo finishing and industrial print, all of which often use more than four inks, so the fact that a dispersed screen avoids moiré problems is also very helpful.
Dispersed screening can retain more detail and tonal subtlety than conventional screening can at the same resolution. This makes such screens particularly relevant to single-pass inkjet presses, which tend to have lower resolutions than the imaging methods used on, say, offset lithography. An AM screen at 600 dots per inch (dpi) would be very visible from a reading distance of less than a meter or so, while an FM screen can use dots that are sufficiently small that they produce the optical illusion that there are no dots at all, just smooth tones. Many inkjet presses are now stepping up to 1200dpi, but that’s still lower resolution than a lot of offset and flexo printing.
This blog post has concentrated on binary screening for simplicity. Many inkjet presses can place different amounts of ink at a single location (often described as using different drop sizes or more than one bit per pixel), and therefore require multi-level screening. And inkjet presses often also benefit from halftone patterns that are more structured than FM screens, but that don’t cluster into discrete dots in the same way as AM screens.
The above is an excerpt from our latest white paper: How to mitigate artifacts in high-speed inkjet printing. Download the white paper here.
If you are new to inkjet and are building your first press no doubt you’ll have many questions about the workflow and the Digital Front End.
In fact, you’re probably wondering how to scope out the functionality you need to create a DFE that is customised to exactly what your customers require. Among your concerns will be how you’re going to achieve the throughput you need to keep the press running at rated speed, especially when handling variable data. Or it might be handling special colours or achieving acceptable image quality that is keeping you awake at night. And how to achieve this without increasing the bill of materials for your press?
At Hunkeler Innovationdays we’ll have a range of resources available to address just such questions with some real case study examples of how our OEM customers have solved the problems that were causing them a headache using our technology and the skills of our Technical Services team.
For instance, how, on a personalised run, when every label or page might be different, can you stop the press from falling idle whilst the RIP catches up? Our ScreenPro™ technology helps Mark Andy cut processing time by 50% on the Mark Andy Digital Series HD, enabling fully variable (every label is different) continuous printing at high-speed and at high-quality.
How can you avoid streaking on the image if your substrate is racing under your printheads at speeds of up to 300m/min for aqueous and maybe 90m/min for UV. Or mottling? The Mirror and Pearl Advanced Inkjet Screens™ available with ScreenPro have been developed specifically to address these problems.
During the lifetime of the press, how can you avoid variations in quality that look like banding because your printheads have worn or been replaced? Take a look at what Ellerhold AG has achieved by deploying PrintFlat™.
The ScreenPro screening engine is one of the building blocks you’ll need for your inkjet press. Our Fundamentals components provide other functions that are essential to the workflow such as job management, soft proofing, and colour management.
Using a variety of white papers, print samples, video footage and case studies , we’ll be sharing our experience. So, come along and meet the team: that’s me, Jeremy Spencer, Justin Bailey and our colleague Jonathan Wilson from Meteor Inkjet if you want to chat about their printhead driver electronics that are endorsed by the world’s leading industrial inkjet printhead manufacturers.
In days gone by, almost every job was more or less 600 dpi in both directions. Now there is a drive to higher definition, with higher resolutions and smaller drop sizes.
So we’ve introduced a new feature in ScreenPro™ that allows the resolution of a job to be “upscaled” meaning that a RIP can still render at 600 dpi through an existing workflow and then ScreenPro can upscale the job to the printer resolution. The benefit is that you don’t need to change your existing workflow, can cut down on RIP time by RIPping at 600 dpi, but print on a 1200 dpi machine for increased definition.
There are various ways of achieving higher resolutions: use the new generation of print heads running at 1200 dpi, use multiple print bars, or use scanning head printers for multiple passes. Sometimes it really is increased resolution that is required and other times it is higher addressability and, for example with textile printing, sometimes you just need to be able to put down more ink in any given location.
Once manufacturers have achieved 1200 x 1200 dpi there are other problems to solve. There is four times as much data generated that needs to be passed through the workflow pipeline to the press compared to a 600 dpi data path. There are some applications where the higher addressability isn’t needed, and 600 dpi is ok, in this case you could run the press twice as fast and get twice the production if you ran it at 1200 x 600 dpi, or three times as fast at 1200 x 400 dpi.
To solve the problem of too much data slowing down processing times we have implemented resolution upscaling in the latest release of ScreenPro. The typical example is that we have an existing press and workflow to go with it at 600dpi. The RIP delivers data at this resolution. We then have a choice – to send it to the 600 dpi printer, in which case we screen as normal, or we send to the 1200 dpi machine.
In this simple case we use ScreenPro to double the number of dots it produces in both directions. For non-square resolutions we multiply in one direction only. Also for non-square resolutions we have to change the shape of the screens, a circular screen will be distorted by the non-square printer resolution so we have to correct for that up front.
What this means is that you can continue to RIP at 600 dpi and keep the same workflow right up to the last process of screening. You keep the same PC processor requirements, same network data transfer speeds. Only at the last stage use ScreenPro to upscale to your desired resolution.
This will be a really useful feature for many customers developing the next generation of high definition digital printers.
Join us at Hunkeler Innovationdays 2019 to learn more about the new features in ScreenPro.
Watch our latest video showcasing our award-winning technology, ScreenPro with PrintFlat.
Global Graphics Software’s Technical Services team worked with Ellerhold AG, the leading poster printing house in Germany, to enhance the printing quality of its large-format posters. The result was 100% customer satisfaction and an increased market share of outdoor advertising products in digital printing.
The Inkjet Conference Düsseldorf has been and gone for another year and we’re already looking ahead to the 2019 events that will be organised by ESMA.
This year delegates in the audience were able to submit questions via an app for the first time. I’m grateful to the IJC for sending me the questions that we either didn’t have time to cover after my presentation, or that occurred subsequently. So here they are with my responses:
Is it possible to increase the paper diversity with software by e.g. eliminating paper related mottling?
Yes, we have yet to come across a media/ink combination ScreenPro™ will not work well with. The major artefact we correct for is mottle. This may mean you can print satisfactory results with ScreenPro on papers where the mottle was unacceptable previously, so increasing the diversity of papers that can be used.
It sounds like ScreenPro is very good at tuning a single machine. How do you also then match that output quality among several machines?
There are two technologies in ScreenPro, the screening core itself with the Advanced Inkjet Screens (AIS), and PrintFlat™ to correct for cross web banding. ScreenPro generally improves print quality and Mirror and Pearl screens (AIS) work in the majority of screening situations. PrintFlat, however, needs to be tuned to every press and if the press changes significantly over time, if a head is changed for example, it will have to be recalibrated. This calibration actually makes subsequent ink linearization and colour profiling more consistent between machines as you have removed the cross-web density fluctuations (which are machine specific) from the test charts used to generate these profiles.
“We haven’t found ink or substrate that we couldn’t print with.” Does this include functional materials, such as metals, wood, rubber? or is it limited to cmyk-like processes?
No – with ScreenPro we have only worked with CMYK-like process colours, i.e. print that is designed to be viewed with colour matching etc. ScreenPro is designed to improve image quality and appearance. I see no reason why ScreenPro would not work with functional materials but I would like to understand what problems it is trying to solve.
What is the main innovation of the screening software in terms of how it works as opposed to what it can do?
“How it works” encompasses placing the drops differently on the substrate in order to work around common inkjet artefacts. The innovation is therefore in the algorithms used to generate the screens.
Advanced Inkjet Screens are standard in the ScreenPro screening engine