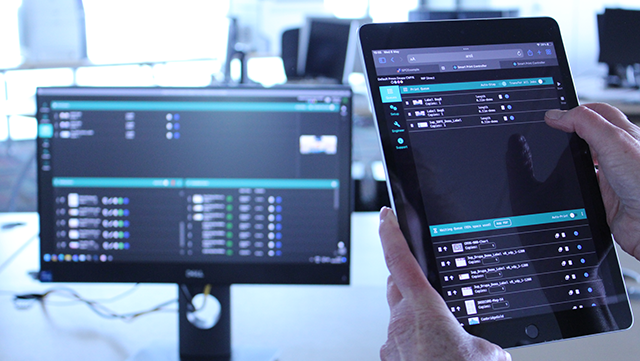
The countdown to Labelexpo Europe is on

With less than two weeks to go until Labelexpo Europe 2023, the countdown is on: the team are packing up their demo machines and looking forward to heading over to Brussels on the Eurostar. This year, we’ll be showcasing the award-winning SmartDFE™, the AI-powered Digital Front End for high-speed, single-pass industrial inkjet presses. We chatted to Ian Bolton, product owner of the Smart Control components in SmartDFE, about what you can expect to see when you visit us on the Hybrid Software Group stand 8b/45:

Ian Bolton, product manager for SmartDFE at Global Graphics Software
Ian Bolton, product owner of the Smart Control components in SmartDFE at Global Graphics Software

This will be my first time at Labelexpo Europe and I’m excited to be demonstrating the SmartDFE, which is not only built on established, award-winning technology, including the world’s fastest PDF RIP, Harlequin RIP®, but also has some new, ground-breaking technology inside.

SmartDFE is a combination of technologies that OEMs can choose to customize to suit their needs, so we can demonstrate whichever component our visitors are interested in.

The Smart Print Controller™ is the hub of SmartDFE and the interface where the press operator manages job submission and connects to the Harlequin RIP. Its automation capabilities provide complete control of the print workflow, as well as valuable information for QA and inspection, press maintenance and stock control. We’ll also be demonstrating Streamline Autotune™, which leverages artificial intelligence and machine learning to print the best image quality at the fastest printing speeds.

SmartDFE also includes a suite of components that simplifies the process of obtaining good quality and color, due to encoding specialist knowledge within the software. This makes selecting the appropriate media and ink set combination very easy for users of any level of color expertise and takes care of calibrating a given press to match your reference settings as well!

Of course, we mustn’t forget the workflow components in SmartDFE: with STEPZ™ and Smart Workflow™, you can perform a thorough pre-flight check on PDF files to optimize them to print efficiently and at high quality – and use additional features to handle various pre-press tasks that usually require a specialist reprographics studio to correct.

I’m looking forward to welcoming you any time to Stand 8b/45. If you’d like to arrange a demo in advance, then don’t hesitate to contact me: ian.bolton@globalgraphics.com

#LabelexpoEurope2023

Be the first to receive our blog posts, news updates and product news. Why not subscribe to our monthly newsletter? Subscribe here

Mako helps to increase productivity and profitability for HP Site Flow users

HP chose Mako™, an SDK from Global Graphics Software that offers pre-flighting options and streamlines PDFs.
HP Site Flow is a workflow and production automation system for HP digital press owners.

When HP Inc began developing HP Site Flow, an end-to-end workflow and production automation system for HP digital press owners, they encountered several challenges including: addressing the growing personalized market; the need to ‘normalize’ PDFs, given the wide variation in the quality of files entering the system; and the ability to quickly scale up or down to accommodate varying levels of demand.

Read the case study to see how Mako Core™ SDK proved its capability and adaptability by rising to HP Site Flow’s development challenges, resulting in increased productivity and profitability for its users.

Download the case study: HP uses Mako for HP Site Flow

DOWNLOAD THE CASE STUDY

To be the first to receive our blog posts, news updates and product news why not subscribe to our monthly newsletter? Subscribe here

Follow us on LinkedIn,  Twitter and YouTube

Digital watermarking in print workflows – Part 1 – How to add a digital watermark

Digital watermarking is an emerging technology, part of the latest step on the evolution of product identification. Global Graphics Software has partnered with Digimarc, a leader in digital watermarking and a member of our Partner Network, to explore this topic and future developments.

In this first of two posts, Martin Bailey explains the ways you can add a digital watermark:

A digital watermark may be added in one of two ways:

1. Using steganography
If a product design includes images, whether photographic or generated digitally, data can be hidden within that image data using steganography. Steganography is the practice of concealing a message within another message or a physical object (source: Wikipedia).

In order to hide the data, the color values of individual pixels in the image are altered in a way that is intended to not be obvious to the human eye. The alterations may need to be applied slightly differently depending on the image content and the print technology to be used. This means it’s often valuable to be able to proof a design with the images in place, and to do that either on the printing device that will be used for production, or on one that has been carefully tuned to reproduce color, tones and levels of detail to match that production device.

Alternatively both the printer/converter and their customer can inspect the artwork and verify the Digimarc code using PACKZ® or CLOUDFLOW® Proofscope, professional prepress tools from HYBRID Software. As well as checking for the correctness of the code, this also allows verification that the code placement conforms to the customer’s requirements, and supports a formal approval process.

Reviews of the proofed output may lead to a decision to re-embed the data into the image with slightly different parameters. Systems to automate that adjustment are improving, but the advisability of proofing means that steganography is best used at a point in the workflow where an appropriate review and reconfiguration may be made without disrupting throughput.

Steganography is a very effective technique if the same image will be used on every instance of an item because it can be difficult for a forger to reproduce. But if your goal is to encode unique data in each instance, you’d have to generate an altered image for each one. When you’re producing watermarks for a large number of instances that would mean generating a huge number of copies of what started off as a single image. In most workflows and for most products that’s not a commercially viable approach.

2. Artwork masking layer
The second method for adding a digital watermark is to overlay an “artwork masking layer” that encodes the desired data. This is a pattern of graphics across large areas of the design, making sure that those graphics are sufficiently fine that they are not immediately apparent to a viewer. In practice this usually means something that looks like a sprinkling of very fine dots under a magnifying glass or loupe.

A digital watermark as an artwork masking layer over a plain yellow area of a job.

These overlays are also very difficult for a forger to reproduce. They have the advantage over hiding data in images that they can also be used in efficient workflows to carry unique data for each product instance; there is much less data to handle for every copy.

This is an excerpt from the white paper: Optimizing Digital Watermarking in Print Workflows. To learn more about digital watermarking download your copy:

DOWNLOAD YOUR COPY OF THE WHITE PAPER

White paper: Optimizing digital watermarking in print workflows

About the author

Martin Bailey, CTO, Global Graphics Software

Martin Bailey, former distinguished technologist at Global Graphics Software, is currently the primary UK expert to the ISO committees maintaining and developing PDF and PDF/VT. He is the author of Full Speed Ahead: how to make variable data PDF files that won’t slow your digital press, a guide offering advice to anyone with a stake in variable data printing including graphic designers, print buyers, composition developers and users.

Further reading

  1. When to add a digital watermark in the print workflow

To be the first to receive our blog posts, news updates and product news why not subscribe to our monthly newsletter? Subscribe here

Follow us on LinkedIn,  Twitter and YouTube

Streamline your PDF files for optimal press performance

Are you confident that all your print jobs can be printed at full press speed? How do you know at what speed the press can be run for a given combination of print job – RIP / RIP – PC etc.

In his presentation at the recent FuturePrint Tech Digital Print for Manufacturing, David Stevenson explains how, using Streamline™ and the help of machine learning, we can analyze a PDF file and intelligently estimate how long it will take for that file to run through the press. But it doesn’t stop there: David explains how we can then optimize the file to ensure it will fly through the press without compromising quality or color integrity.

Further reading:

Ditch the disk: a new generation of RIPs to drive your digital press

Is your printer software up to the job? The impact of rising data rates on software evolved from traditional print processes 

Future-proofing your digital press to cope with rising data rates

To be the first to receive our blog posts, news updates and product news why not subscribe to our monthly newsletter? Subscribe here

Follow us on LinkedIn,  Twitter and YouTube

Processing PDF without in-RIP color management

Twenty years ago it was common to find people RIPping jobs for production print with no color management. Indeed, many print service providers (PSPs), magazine publishers etc actively avoided it as being “too complicated” and “unpredictable”. You might read that as an indictment of their vendors for a lack of investment either in developing good product or in educating their users. Alternatively it might simply show that the printing companies were quite understandably risk-averse because it could be expensive if the client didn’t like the resulting color, especially in an environment like display advertising in a major magazine, or packaging for a major brand.

A decade after that more and more people (on both the buying and the printing sides) grasped the value of color management in print and were using it, but there was still a significant minority that had not managed to make the time to understand it. This is borne out by the uproar when Adobe ‘forced’ people to use color management by changing from using CMYK for the alternate color space for Pantone spots in Creative Cloud to using Lab1, and by the continuing demand for support for PDF/X‑1a, where everything has already been converted to press colorants before the PDF is made.

Now we’re in 2022, and the need for color management is accepted almost universally in print sectors that use an ink set based on CMYK. I phrased it that way because some of the industrial print space (textiles, ceramics, laminate flooring etc) have historically used many inks, but usually job-specific rather than CMYK. Some of those markets will continue to use job-specific ink sets as they transition to digital, while others would find a switch to digital extremely challenging without a concurrent switch to a color managed workflow2.

So, why am I writing this now?

It’s because I still talk to people who tell me that they don’t need to do any color management inside the RIP when processing PDF; they RIP it first and then apply color management.

I’m sorry, that just won’t work reliably and with maximum quality.

There was a time, back in the days when PDF 1.3 was the latest and greatest (which pretty much means last millennium) when a PSP could get away with this approach, because their customers were happy to define all their colors in CMYK and spots. As soon as they used anything else, including Lab or colors tagged with ICC profiles, they’d have to have some fallback to generate CMYK values from that data. It doesn’t need a full color management module (CMM), but they’d need something.

And then along came PDF 1.4, adding transparency. And transparency requires that you can convert colors between color spaces, potentially multiple times. That’s because PDF transparency includes the concept of transparency groups. Each group is one or more graphics that are blended with any graphics that are behind them in the design.

The blending depends on a number of parameters, the most obvious of which are the blend mode (Overlay, Multiply, Hard Light etc), and the blend color space. The result of rendering all graphics that are underneath the transparency group will be transformed from whatever space the RIP holds it in (often the CMYK for the output device) into the blending color space. The result of rendering all the graphics inside the transparency group itself is also transformed into the blending color space. Then the blend mode is applied, to do the actual transparency calculation, and the result is transformed back into whatever color space the RIP needs it to be in for further processing (again, often the CMYK of the output device). The blending color space is quite often sRGB, because that’s the default in a number of popular design applications.

So correct rendering of the transparency will often require color transforms between the color space in which graphics are specified (such as, maybe, an image tagged with an ECI RGB ICC profile), the blend color space (most commonly sRGB) and the output device color space (usually a specific CMYK). That’s just not possible without applying a pretty complete color management process during RIPping. And if you try to take short-cuts you’ll usually get a visually different result, sometimes very different.

Color transformation with transparency requires a full color management capability.

Even so, back in the early 2000s a PSP could avoid the need to upgrade software, process control and operator training by insisting that their customers supplied files in a format such as PDF/X-1a, which prohibited device-independent colors and transparency. But making a PDF/X-1a file from a rich design in a creative application requires a number of compromises affecting graphical elements that were originally specified in device independent colors, or which use transparency. Both risk degrading the quality of the final piece.

These days insisting on PDF/X-1a to avoid the need for color management in the RIP is no longer widely acceptable to customers3. And therefore neither is color managing after the RIPping is complete.

Your check-list is therefore:

  • Don’t use PDF/X-1a. In fact don’t use PDF/X-3 either. Both are two decades old. PDF/X-3 may allow device-independent colors, but both of them force the creation tool to flatten transparency, discard layers and a bunch of other potentially damaging procedures. It’s over ten years since PDF/X-4 was published, and that’s currently the best balance between capability and getting too far ahead of common usage in print workflows.
  • If you’re a print service provider, converter, industrial printing manufacturer or digital press vendor, don’t cut corners; use a workflow that applies the color management in or before the RIP4. It shouldn’t be hard; all the leading RIP vendors (and therefore leading press vendors, because they license technology from the RIP vendors) supply suitable systems.

About the author

Martin Bailey, consultant and former 0CTO, Global Graphics Software

Martin Bailey, consultant at Global Graphics Software, is a former CTO of the company and currently the primary UK expert to the ISO committees maintaining and developing PDF and PDF/VT. He is the author of Full Speed Ahead: how to make variable data PDF files that won’t slow your digital press, a guide offering advice to anyone with a stake in variable data printing including graphic designers, print buyers, composition developers and users.

To be the first to receive our blog posts, news updates and product news why not subscribe to our monthly newsletter? Subscribe here

Follow us on LinkedIn,  Twitter and YouTube

Notes
1 – If a spot color will be emulated using process inks on press, then using a CMYK alternate gives predictable color numbers in those inks, but is less good at producing a predictable color appearance. Using Lab for the alternate color space often leads to unpredictable color numbers on each separation, but a more predictable color appearance on the print. There is a benefit to both models, but when it comes to paying for printing the color appearance usually wins!

2 – if run-lengths on digital are long enough to justify warehousing a variety of inks, and changings inks on inkjet presses, it can be reasonable to stay with job-specific ink sets, especially if it’s difficult or expensive to make usable inks for all of CMY and K. As an example, the best Magenta ink for inkjet printing on ceramics is made with gold. Any move to using digital presses for short-run printing more or less requires a fixed ink set to allow for quick job changes without excessive waste, and that typically means CMYK+.

3 – and I say that as the chair of the committees that developed PDF/X for many years, first in CGATS and then in ISO.

4 – There are situations where applying color management in a color server before the RIP can be useful, especially when multiple presses will be used in parallel. This approach brings its own challenges around handling spot colors in the job that will be emulated on press, but can produce excellent results when used with care.

Keeping up to date – how the car analogy may no longer be relevant in the printing world

In his latest blog post, Martin Bailey, consultant at Global Graphics Software, takes a look at some of the reasons why his go-to car analogy to help his audience understand the world of print may no longer be as relevant as it once was:

Over the years I’ve used analogies in many of my blog posts, conference presentations and white papers; they’re a very effective way of sharing a high-level understanding of sometimes complex ideas. I’m not a car fanatic, so I’ve not had any specific motivation to compare print technologies to anything around cars, but for some reason it seems that car analogies have consistently just worked, so I’ve used them.

But I realized recently that I’m going to have to rework some of them in response to the growth of electric vehicles replacing internal combustion. I know that growth is very uneven across the world (wow, go Norway!), but it’s clearly the future of motoring for many of us. Much of what I write and report might be summarized as “this is the future and how we’ll get there”, so building on something that will become more and more outdated for many readers and listeners introduces an unwelcome distraction from the analogy. It also makes it less effective because analogies must be based on a common understanding or experience, otherwise they just don’t work.

On the other hand, internal combustion vehicles are not even close to the point yet where all readers and listeners will regard them as dinosaurs of historical interest only. So I can’t sensibly use them as a representation of what we were all doing in the past.

So, I thought I’d look through some of the car-based analogies I’ve used to see which need updating, and which are fine as they are:

I’ve often compared a digital press and its associated digital front end (DFE) to the components of a car:

  • The supplied job file, probably in PDF, is the fuel
  • The steering wheel and dashboard are the DFE control systems and user interface
  • The engine is the RIP (clearly the most important part of the entire system, but then I may be biased!)
  • The gearbox and transmission are the electronics and drivers, like those from our friends at Meteor inkjet
  • The wheels are the inkjet heads, actually putting the rubber/ink on the road/substrate

Well, some of those parts still make sense, but I’m not sure that I can equate submitting a PDF file to charging a battery. Somehow the motors in an electric vehicle never seem to have the prominence that I’d personally give to a RIP. And the motors are often linked direct to the wheels, with less of the gearbox and transmission infrastructure than you’d use for internal combustion. This one needs some serious fixing.

Next up is a statement that we used, for example, in Full Speed Ahead: how to make variable data PDF files that won’t slow your digital press: that making a PDF file constructed for efficiency is like using better fuel in a car. There can be a clear step-up from regular to super for gasoline/petrol, but electricity is electricity, at least once it’s in the car battery.

I guess you could argue that charging points with different power capabilities, from 7kW up to 350kW, will significantly affect how long it will take to recharge the car, and therefore on how far you can get in a day, but it’s not really the same discussion. That’s another analogy that I’m going to have to work on.

And finally, for now, I’ve described companies who build digital presses without thinking about software to process job files and proper user interfaces as being like people thinking they can sell rolling chassis: cars with no bodywork, no seats and not even a cup-holder. You may get a few sales for that in specialist markets, but it’s not exactly a mass market.

Of the three analogies I’ve listed here, I think this is the only one that might survive unscathed, although it probably has less value without being able to equate the other bits of the car to digital press and DFE components.

As I said to start with, I had no reason to pick cars as the base for analogies that I use other than that they seemed to work well. I have a feeling that may not be as true in the future. I guess there did have to be one advantage to big oil!

About the author

Martin Bailey, CTO, Global Graphics Software

Martin Bailey, consultant at Global Graphics Software, is a former CTO of the company and currently the primary UK expert to the ISO committees maintaining and developing PDF and PDF/VT. He is the author of Full Speed Ahead: how to make variable data PDF files that won’t slow your digital press, a guide offering advice to anyone with a stake in variable data printing including graphic designers, print buyers, composition developers and users.

To be the first to receive our blog posts, news updates and product news why not subscribe to our monthly newsletter? Subscribe here

Follow us on LinkedIn and Twitter

Introducing SmartDFE to INKISH TV at Fespa 2022

At the recent Fespa show in Berlin, Justin Bailey, managing director at Global Graphics Software, spoke to Morten Reitoft of INKISH TV about the technologies offered for inkjet by Hybrid Software Group and why the SmartDFE™ is a key component if you’re planning to integrate print into your smart factory. 

Find out more:

  1. Global Graphics Smart QI: New Platform for On-the-Fly Inspection
  2. Connecting print to a smart factory.
  3. How to transform your inkjet business with Industry 4.0 and OPC UA
  4. Short introduction to the OPC UA

Be the first to receive our blog posts, news updates and product news. Why not subscribe to our monthly newsletter? Subscribe here

Follow us on LinkedInTwitter and YouTube

How to integrate print into the Smart Factory

Join us at the Industrial Print Integration conference

It’s my first time at the Industrial Print Integration Conference; I’ve packed my suitcase and my passport is raring to go, glad to be out of the drawer after two years of hibernation. I’m looking forward to meeting new people in the industry and learning about the new developments in technology.

If you’re interested in integrating print into your smart factory, join me for my talk at 12.30pm on Wednesday, 18 May 2022. I’ll be explaining how you integrate inkjet into the Smart Factory with the help of fully automated software that connects to the rest of the production system via Industry 4.0 technologies like OPC UA, the open standard for exchanging information for industrial communication. I’ll also explain how you can build in capability so you can deliver everything from mass production to mass customization at the same cost as current print systems.

And if you want to know more, then come along to our booth A7. We’re going to be showing a demo of our SmartDFE™, which I think is pretty impressive. You can watch a snippet here:

SmartDFE is our smart software that drives an inkjet printing subsystem in a factory setting, including those printers used for ultra-high speeds and 300m per minute production rates! The demo shows what happens when you combine high-tech SCADA systems (Supervisory Control and Data Acquisition) with OPC UA to monitor and control virtual print subsystems via iPads. You can control them both inside and outside of your plant location so management always knows what’s happening without ever having be physically present.

If you haven’t registered yet, there’s still time: https://ipi-conference.com/register/delegate

I hope to see you there!

About the author

Ian Bolton

Ian Bolton, Product Manager, Direct
Ian Bolton, Product Manager – SmartDFE™ and Direct™

Ian Bolton is the product manager for SmartDFE™ and Direct™. He works with printer OEMs to break down barriers that might be preventing them from reaching their digital printer’s full potential. A software engineer at heart, Ian has a masters in Advanced Computer Science from the University of Manchester, and over 15 years’ experience developing software for both start-ups and large corporations, such as Arm and Sony Ericsson. He draws on this technical background and his passion for problem-solving to define and drive features and requirements for innovative software solutions for digital print.

Be the first to receive our blog posts, news updates and product news. Why not subscribe to our monthly newsletter? Subscribe here

Follow us on LinkedInTwitter and YouTube

What you need to build a press that must handle variable data jobs at high speed

I’ve spoken to a lot of people about variable data printing and about what that means when a vendor builds a press or printing unit that must be able to handle variable data jobs at high speed. Over the years I’ve mentally defined several categories that such people fall into, based on the first question they ask: 

  1. “Variable data; what’s that?” 
  2. “Why should I care about variable data, nobody uses that in my industry?” 
  3. “I’ve heard of variable data and I think I need it, but what does that actually mean?” 
  4. “How do I turn on variable data optimization in Harlequin?” 

If you’re in the first two categories, I recommend that you read through the introductory chapters of our guide: “Full Speed Ahead: how to make variable data PDF files that won’t slow your digital press”, available on our website. 

And yes, unless you’re in a very specialised industry, people probably are using variable data. As an example, five years ago pundits in the label printing industry were saying that nobody was using variable data on those. Now it’s a rapidly growing area as brands realize how useful it can be and as the convergence of coding and marking with primary consumer graphics continues. If you’re a vendor designing and building a digital press your users will expect you to support variable data when you bring it to market; don’t get stuck with a DFE (digital front end) that can’t drive your shiny new press at engine speed when they try to print a variable job. 

If you’re in category 3 then you’re in luck, we’ve just published a video to explain how variable data jobs are typically put together, and then how the DFE for a digital press deconstructs the pages again in order to optimize processing speed. It also talks about why that’s so important, especially as presses get faster every year. Watch it here:
 

And if you’re in category 4, drop us a line at info@globalgraphics.com, or, if you’re already a Harlequin OEM partner, our support team are ready and waiting for your questions.

Further reading:

  1. What’s the best effective photographic image resolution for your variable data print jobs?
  2. Why does optimization of VDP jobs matter?
  3. There really are two different kinds of variable data submission!

Be the first to receive our blog posts, news updates and product news. Why not subscribe to our monthly newsletter? Subscribe here

Follow us on LinkedInTwitter and YouTube


APS Engineering joins Global Graphics Software Partner Network

A warm welcome to our new Global Graphics Software Partner Network member: APS Engineering.

APS Engineering creates cutting-edge ink delivery systems for all stages of production for inkjet printing, additive manufacturing, and microdispensing. The company has worked together with Global Graphics Software to create the first OPC UA-enabled ink delivery system for SmartDFE, a full software and hardware stack that adds print to the fully automated smart factory.

SmartDFE™ is designed to be the heart of a fully automated manufacturing system and transform the role of the digital press in the smart print factory of the future.

OPC UA is the interoperability standard for the secure and reliable exchange of data in the industrial automation space and in other industries. It is platform-independent and ensures the seamless flow of information among devices from multiple vendors.

The OPC UA-enabled ink delivery system developed together with APS Engineering can communicate with anything in the industrial inkjet ecosystem. This means that the press can be monitored remotely from an iPad or from a browser on the desktop, or that data can be stored from the ink delivery system in a historical archive database to enable other functions like predictive maintenance.

In addition to fluid delivery systems, APS Engineering also offers printbar design and consulting services for custom projects. We look forward to working together in the future.

Be the first to receive our blog posts, news updates and product news. Why not subscribe to our monthly newsletter? Subscribe here

Follow us on LinkedInTwitter and YouTube