
Harlequin Core™ has long been recognized for its top-tier processing speeds in print workflows. Our recent release, Harlequin Core 14.0r1, brings significant optimizations aimed at maximizing efficiency when printing variable data in labels and packaging jobs.
Understanding the need for speed in VDP Jobs
Printing variable data is commonplace in the labels and packaging industry; barcodes can provide authentication, and personalization and custom branding are increasingly in demand. These complex files can affect processing speeds on large-volume print runs. To refine our software, we constantly analyze files and data from customers. These range from files created in streamlined PDF editors like PACKZ to highly complex workflows powered by Harlequin in multi-RIP setups.
With each release, we identify and fine-tune areas to optimize performance, often finding new ways to boost throughput by reusing variable content in jobs that have similar elements. For this reason, Harlequin RIPs with Harlequin VariData™ (HVD) are renowned as some of the fastest RIPS available, but we know there’s always room for growth.
Increased processing speeds in Harlequin Core
In the latest version of Harlequin Core we focused on optimizing repetitive, high-volume jobs. Take, for example, a 6,000-page step-and-repeat project similar to this one below. For such cases, we found ways to speed up processing by improving our handling of image profiles, background details, and white space within each print job.

Here are some highlights:
- Performance Gains: Our latest tests on high-volume jobs indicate an average performance improvement of around 15%. Some jobs saw even more pronounced gains, especially those with specific image and background characteristics that benefit from these optimizations.
Graph showing Job Duration:
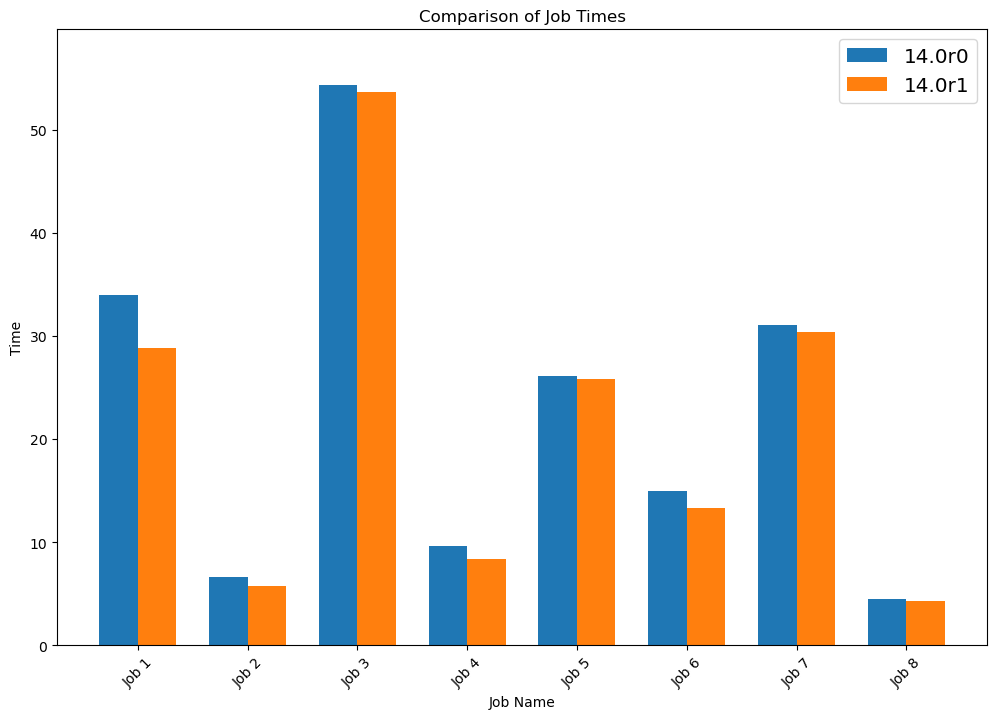
- Consistent results across test systems: These results were validated by a leading OEM partner, showing consistent improvements on real-world test systems, proving these aren’t just theoretical improvements.
- Reusability of variable content: By focusing on variable data reuse, we’ve made it easier to reduce the processing times in jobs that use repeated elements, typical in packaging designs.
Tips for maximizing performance with Harlequin RIPs
While Harlequin Core 14.0r1 offers impressive built-in optimizations, you can further enhance performance by using best practices for VDP PDF creation. Together with the PDF Association, we’ve compiled guidelines to ensure your variable data PDFs are as efficient as possible. Following these guidelines can streamline your workflow, making the most of your Harlequin-powered DFE.
Explore VDP PDF creation best practices
With every release of Harlequin Core, we’re reinforcing our commitment to innovation, quality, and performance for the digital print industry. Whether you’re managing a single print job or operating a Harlequin RIP farm, these latest enhancements in performance, especially for labels and packaging, help you keep pace with industry demands and push the boundaries of what’s possible.
Get started with Harlequin Core
For a detailed rundown of what’s new, see the release notes together with all documentation on our website.
Further reading:
- Boosting print performance: Jetron’s success with Harlequin Core
- Case study: HP PageWide Industrial raises the bar with the Harlequin RIP®
Be the first to receive our software release updates, blog posts, company and product news. Why not subscribe to our newsletter? Subscribe here